Installing the LI-300 and LI-350
To ensure that you collect valid soil measurements, use great care when installing soil moisture sensors. Scrutinize data for unexpected readings, and check installations regularly and correct any issues that may introduce uncertainty into the data.
Another common error is the soil type setting not matching the soil being measured. This is less severe than a poor installation, typically, but recorded measurements still are difficult to correct.
Both of these issues are easy to solve by installing the probe carefully and configuring it correctly. We address installation concerns in this section and configuration concerns later in Configuring the LI-350 (SDI-12).
Installation considerations
Warning: Puncture hazard. Tips of the tines are sharp and may cause a puncture injury. Handle probes with care and keep a protective foam cover in place when the probe is not being installed or in use.
The LI-300 and LI-350 can be installed on the soil surface or buried in a pit. For surface installations, be sure to press the tines fully in the soil. The ideal installation is in a pit with the tines fully inserted into the side of the pit and soil back-filled with the same bulk density. Do not compact the soil or create voids.
Caution: Do not touch the tines with bare hands and do not allow them to come into contact with oils or other non-conductive residues. Oily deposits can affect the measurement accuracy. Clean the tines with mild detergent and rinse with water until clean.
The pitfalls of a poor installation (things to avoid)
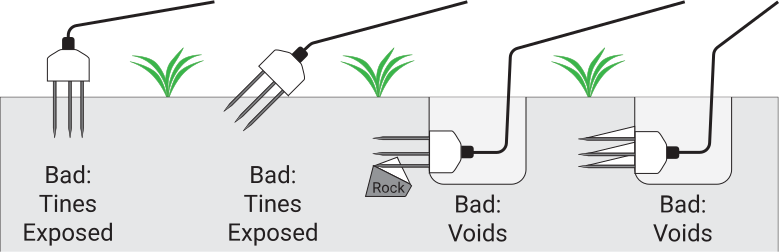
Whether it is installed on the surface or in a pit, the entire length of the tines must be in contact undisturbed soil in order to make accurate measurements. Any portion of a tine that is exposed to open air, air pockets, or pooled water can induce errors in the measurement. Figure 2‑1 shows common problems with poor installations.
-
Press the tines into undisturbed soil.
-
Do not touch the tines; oils from skin will affect measurements. Clean tines with mild detergent and water if touched.
-
If a tine makes contact with a rock or root during insertion, install the probe in a different location. Do not push, as the rock may move, creating a void around the tine, or worse, the tine may bend.
-
If the probe shifts after insertion, voids will be created around the tines. Install the probe in a different location.
The potential of a proper installation (good, better, and best)
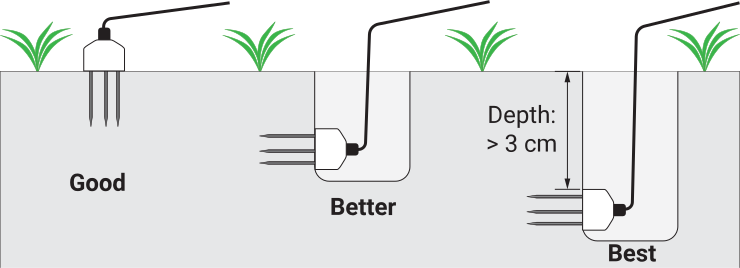
For the best results, follow these guidelines when installing a probe. See Figure 2‑2.
-
Be sure that the full length of each tine is in contact with undisturbed soil.
-
Surface installation is good, but burying the probe in an excavation is better. An installation depth >3 cm is best.
-
If installed in an excavation, back-fill the pit with soil of the same bulk density as before excavating. Be sure the probe does not move while back-filling the pit.
Sensor separation distances
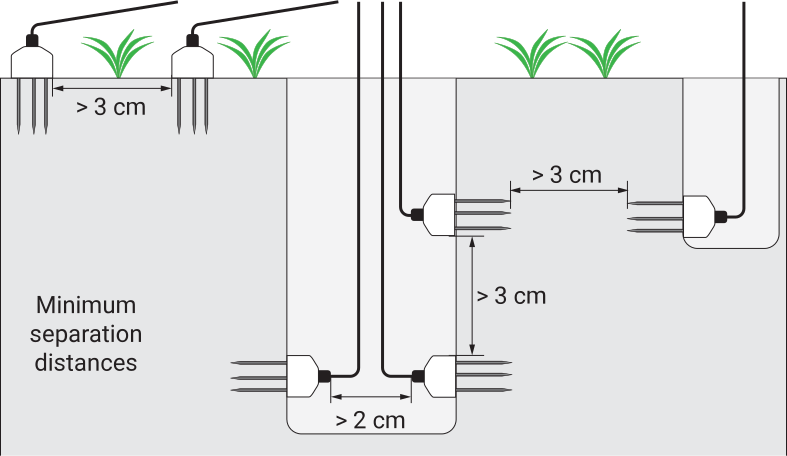
Soil probes are sensitive to a volume that surrounds each probe. If they are too close to one another, sensors may cause interference with each other. To avoid this type of interference, maintain a minimum separation of 3 cm between the tips of tines and the edges of probes. Maintain at least 2 cm between cable glands.