
6400-01 CO2 Mixer
The 6400-01 CO2 Mixer regulates CO2 concentration to some specified target, which is communicated to the mixer as a command voltage. The relationship between the command voltage and the resulting CO2 concentration depends on the bulk flow rate, temperature, and condition of the control apparatus. There is no calibration per se of the CO2 mixer, since it depends on the CO2 analyzer to “report back” what concentration is being achieved. There is, however, a calibration that relates command voltage to resulting CO2 concentration, and that is described below.
Calibrating the CO2 Mixer
Before you start, make sure the CO2 source (12 gram cartridge or external tank) has been connected for a few minutes. In the case of the cartridge, make sure it’s reasonably fresh - they only last 8 hours once pierced, whether used or not.
- Run the CO2 Mixer Calibration program
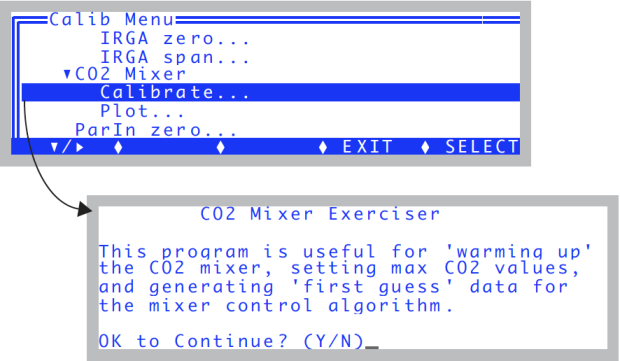
- In OPEN’s calibration menu, select "Calibrate" under "CO2 Mixer" in the calibration menu (Figure 18‑16).
- When prompted to continue, press Y.
- Wait for the upper limit
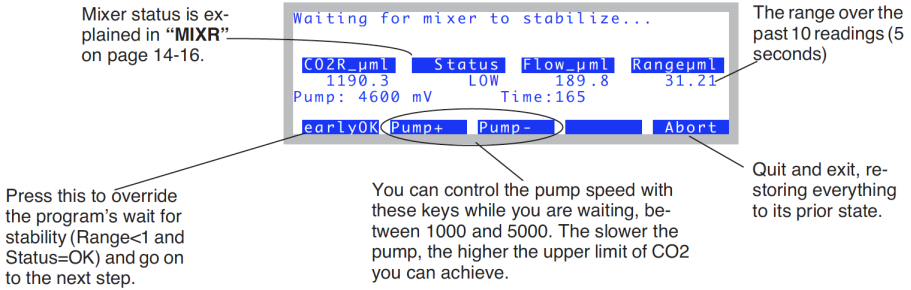
- If the mixer isn’t already on, the system turns it on, and sets its target to the highest possible value (5 volts). The program then waits for stability of the reference CO2 reading to be achieved (Figure 18‑17).
- Stability is achieved the
Rangeμmlvalue drops below 1.0 while the Status indicates “OK”. The function key earlyOK will override these conditions and force the software to proceed to the next step. - OK the upper limit
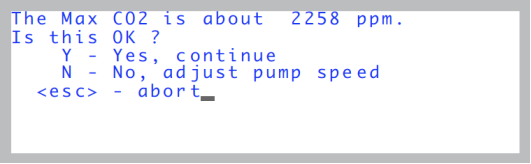
- Once the mixer is stable at its maximum value, this value is presented with an option to change it or continue on (Figure 18‑18).
- (Note: If the max value is less than 2000, then there’s a problem. See Can’t Achieve Low Values.)
- If this is OK, press Y and go to step 4. Otherwise, press N, and adjust the pump speed, and press earlyOK when you are ready.
Adjusting the Upper Limit
The 6400-01 CO2 Mixer option is specified as having an upper range of 2000 μmol mol-1, and the lower limit of control is typically 40 or 50 μmol mol-1. This range can be adjusted by varying the pump speed. When the 6400-01 is installed, the pump runs at a constant voltage, and flow control is done by a flow controller downstream of the point of CO2 injection that diverts air away from the sample path; the excess flow is routed to the reference path (see The Flow Schematic). Without the 6400-01, flow rate is controlled by varying the pump speed. For any rate of injection of CO2, a reduced pump speed results in lower bulk flow and increased CO2 concentration.
- Automatic mixer calibration
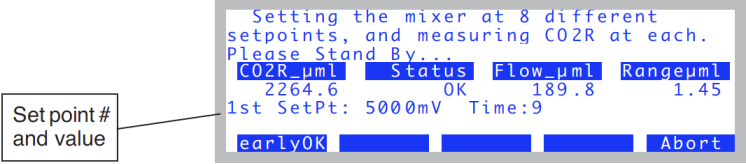
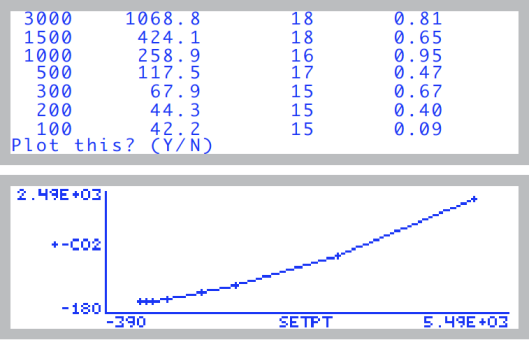
- The program loops through 8 set points, from 5000 mV down to 0 mV, and records the CO2 concentration for each (Figure 18‑19).
- Generally, it should take about 20 to 30 seconds to do each set point. The criteria is that Rangeμml must be < 1, and the Status must be OK. Pressing f1 (earlyOK) causes the point to be accepted, and it moves to the next set point.
- Normally, this takes 8 setpoints, and the low CO2 concentration will be about 40 or 50 ppm. If you have modified the LI-6400 console plumbing (see Modification of LI-6400/XT to Control Low CO2 Concentrations), then the program will automatically detect this from the mixer’s response,and take two extra steps down to 0 ppm.
- View the calibration curve
- Once the calibration is done, the data are printed and you are given an option to plot it (Figure 18‑20).
- You can also see this plot at any later time, by selecting "Plot" under "CO2 Mixer" in the Calib Menu.
- Implement the calibration
- You will be asked if you wish to implement this calibration or not (Figure 18‑21). Press Y if you do.
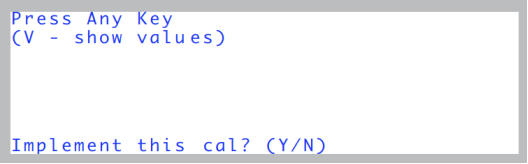
If you implement the calibration, the <user> calibration node is updated, as are the files /dev/.user and /dev/.userhistory.