
6400-01 CO2 Mixer Problems
Stays at Zero
If the CO2 seems to stay at zero even though you’re asking for something else, then check these possibilities:
- Cartridge installed recently?
- Once pierced, the CO2 cartridge lasts for about 8 hours, whether you are using it or not.
- Is the mixer actually turned on?
- From New Measurements mode, press 2 then f3 to access the mixer control panel, then press C for constant control signal, then enter 2000. If this makes the CO2 values climb from 0, whereas the R or S options don’t, then it would indicate a very bad mixer calibration. Go to the Calib Menu, and redo it.
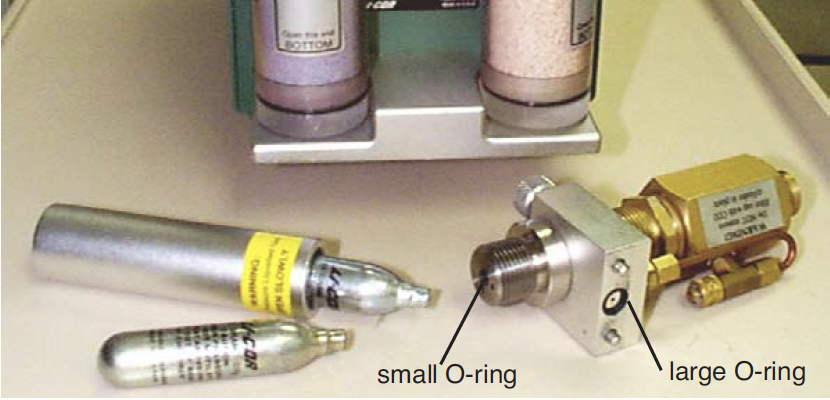
- Check the regulator’s O-ring
- Detach the cartridge holder/regulator from the console, and check to be sure the large O-ring that seals the hole connecting the console and the regulator is in place (Figure 20‑7). If it is not there, the leak will prevent the mixer from operating correctly.
- Check the regulator for flow
- With a pressurized cartridge installed, there should be a very slight flow coming from the hole in the regulator (within the aforementioned large O-ring). One way to check this is to cover the hole with your finger for a 10 or 15 seconds, then release it suddenly; you should hear a little “ppffft” as the built up pressure is released. Alternatively, put a drop of liquid (soapy water or saliva) on the hole, and look for bubbles.
Lack of flow from the regulator can be due to a clogged filter or flow restrictor. See Servicing the External CO2 Source Assembly.
Instability
If the CO2 concentration is not stable:
- Is the soda lime OK?
- The soda lime must be on full scrub. Shake the tube a little bit to break up any “channeling” that might be occurring. Also, try this test: exhale onto the air inlet connector of the console. If you see any response in CO2R_μml to your breath, then your soda lime needs to be replaced (If you see a response in those around you to your breath, then your mouthwash should be replaced as well.)
- Use C mode
- Put the mixer into constant control signal mode (in New Measurements, press 2 then f3, then C, then enter 2000). If the reference cell is much more stable in this mode, then the problem is due to the mixer hunting for the proper setting for the concentration you asked for. If you were using S mode (constant sample cell concentration), the instability could have been aggravated by flow changes (especially if you were also in constant humidity mode, in which the flow can fluctuate) or leaf photosynthetic changes. Try running in R mode instead.
- If C mode doesn’t help, then continue on:
- Is it the IRGA?
- Is the IRGA unstable, or is it the mixer? Go through Unstable CO2 and/or H2O to make sure that it is really the mixer that is the cause of the instability.
- Is the instability worse at high CO2?
- If the instability is not present or small at low concentrations, and noticeably worse at high concentrations, the problem may be due to inadequate flow from the external source assembly. See Step 4, in Calibrating the CO2 Mixer.
Cartridge Only Lasts a Few Hours
There is probably a leak in the CO2 source. To do a leak test, remove the source from the side of the console and install a fresh cartridge. Dip the source regulator assembly into a clear beaker of water, and look for bubbles. Dip it only as far as the bottom of the aluminum block that the mounting screws pass through. (Do not dip it any deeper because water should be kept away from the hole where CO2 exits the source. There is a flow restrictor behind this hole, and if it gets wet, it won’t work again.)
The most probable source of a leak is one of the two compression fittings on the copper tubing that goes from the regulator body to the mounting block (shown in Figure 19‑35). If that is the case, tighten the nut on the copper tubing 1/8 turn at a time until the leak stops.
The leak could also be at the cap on the “T” fitting which contains the filter (same Figure). If this is the case, and tightening the cap doesn’t help, then check the O-ring in the cap. It may be torn. When you remove the source from its bath, do not turn it upside down while it is wet. This will prevent water from running into the regulator through the large hole on its bottom. Dry the bottom of the source and the inside of that hole with an absorbent towel before turning it over.
Slow Achieving a New Value
Typically, it takes 2 or 3 minutes to go from 100 to 2000 μmol mol-1, and less than 1 minute to come back down. If it takes a long time to go up, then see Step 4, Check the regulator for flow. If the problem is erratic closure on the target value (overshooting, undershooting, etc.), then try Calibrating the CO2 Mixer, to improve the mixer’s “first guesses”.
Can’t Achieve Low Values
Typically, the minimum value achieved by the mixer is 30 to 50 μmol mol-1.
If your minimum value is considerably above that, then here are some things to check:
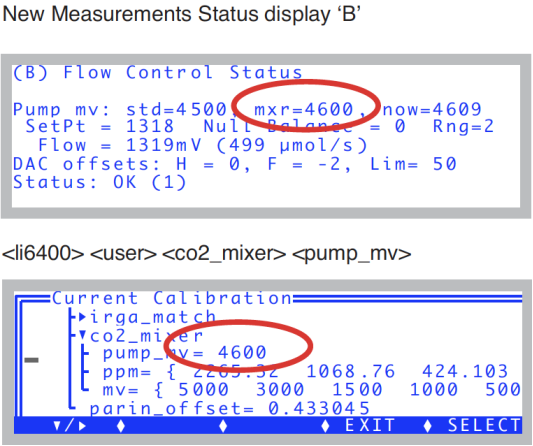
- What’s your maximum flow rate?
- Check the pump speed setting for mixer operations (Figure 20‑8).
- A “normal” value is 4500 or so. If it is much lower, redo the mixer calibration (Calibrating the CO2 Mixer).
- Is the soda lime on full scrub and is it good?
- Turn off the mixer, and verify that the reference CO2 goes to zero. If it doesn’t, there is a problem with the soda lime, or else the IRGA needs to be zeroed.
- Backwards valve
- (If someone has been working on the mixer...) If the valve labeled “Bottom valve” in Figure 20‑9 is installed backwards, then only very high CO2 concentrations will be achieved.
Can’t Achieve High Values
The CO2 mixer should be able to achieve an upper limit in excess of 2000 μmol mol-1. 2200 is a typical value. If you can’t come close to that, or if it takes a long time to get there, check for the following:
- Flow from the source
- See Step 4, Check the regulator for flow.
- Calibration problem?
- Change to C mode (constant control signal), and set a 5000 mV target. If that fixes the problem, then re-do the mixer calibration.
- Bad or leaking valve
- (If someone has been working on the mixer...) If the valve labeled “Bottom valve” in Figure 20‑9 is installed loosely, or without the two O-rings, or has a wire pinched beneath it preventing a tight seal, then it might work OK at lower CO2 values, but not at higher.
- Plugged flow restrictor
- Oil from the CO2 cartridges may have gotten to the flow restrictor on the source assembly. See If the Flow Restrictor Becomes Clogged.
- Contact LI-COR
- If nothing in the previous steps has fixed the problem, then oil may have gotten into the console, and fouled the internal part of the CO2 mixer. Contact LI-COR.

Calibration Program Gives Erratic Results
If the CO2 mixer calibration program gives erratic results - for example a curve that looks like steps instead of being smooth - check for leaks inside the console in the path that goes to the reference IRGA. In particular, make sure all the quick connectors have their tubing pushed into them as far as they should (see Quick Connectors). If there is a leak in the line going to the reference IRGA, CO2 will change too slowly after a change in the mixer set point. OPEN 3.3 is less susceptible to this, since the minimum delay time was increased from 6 to 15 seconds with that software release.
Can’t Seal the 12-gram Cylinder
If you have difficulty sealing the CO2 cartridge (that is, if all the CO2 escapes before you can get the cap screwed down), then:
- Is the small O-ring in place?
- It is shown in Figure 20‑7.
- Examine the pierced hole in the top of the cartridge
- If it is not round, but oblong, then a bent piercing pin on the source may be the culprit.