View Images in the Image Gallery
Click Image Gallery  to see the list of images acquired with LI‑COR Acquisition Software in the current Image Data Folder A folder on your computer's hard drive where internal LI‑COR Acquisition data will be saved.. The following options are available in the Image Gallery.
Sort
Click a column header to sort the table according to the data in that column.
Click a column a second time to reverse the sort order.
You can sort by more than one column. Hold SHIFT while clicking a second column header to sort by the second column. The column with the first sort priority will be indicated with a triangle and circle icon with a single circle (
 ). The column with the second sort priority will be indicated with a triangle and circle icon with two circles (
 ).
).More than two sort levels are possible.
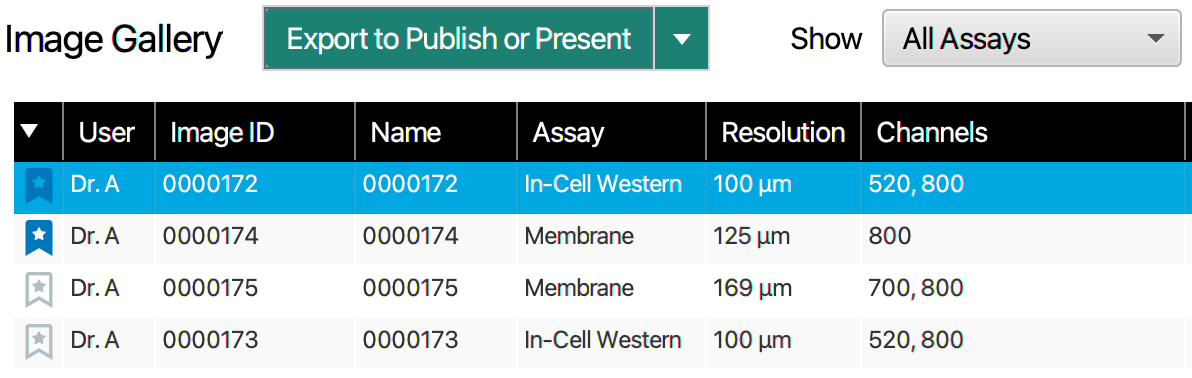
Mark Favorite Image Acquisitions
You can designate an Acquisition as a "favorite" to make the Acquisition easier to find when the list of Acquisitions becomes long.
In the Image Gallery, click the favorite icon next to an Acquisition to designate it as a favorite.
The filled-in favorites icon () indicates an Acquisition that has been marked as a favorite.
Click the column header above the favorites column to group your favorite Acquisitions together. If you do not see your favorite Acquisitions, they have probably been grouped at the bottom of the list. Click the column header above the favorites column again to group favorite Acquisitions at the top of the list. A sort icon (such as
 or
or  ) indicates that the favorites column has been sorted with favorites at the bottom or favorites at the top. See Sort for more information about sorting in the Image Gallery.
Export
The following options are available from the menu above the Image Gallery.
Click to export images to a single file. Import the file into Empiria Studio® Software for analysis.
You can also directly import Acquisitions into Empiria Studio® Software from a LI‑COR Acquisition Software Image Data Folder. See the Empiria Studio 3.2 documentation for more information.
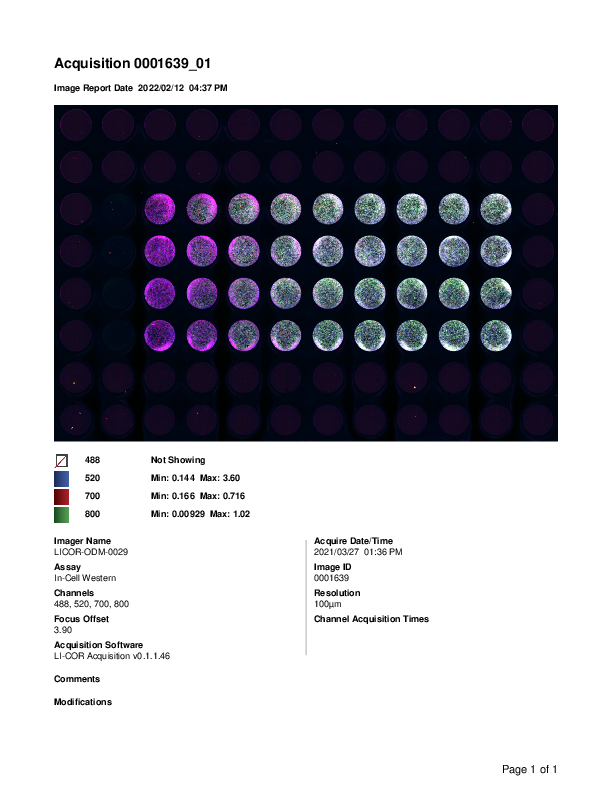
Export To Image Report
Click Export to Image Report to export an image and important information about the image to a PDF. The provided information includes:
Image ID
Imager Name
Channels
Focus Offset
Acquisition Software Version
Comments
Modifications (e.g., crop, rotate, flip)
Acquire Date and Time
Resolution
Export Single Acquisition
If one Acquisition in the Image Gallery is selected when you click , the current image view for that Acquisition will be exported to a single image file. If the Acquisition contains images from multiple channels, an overlay of the displayed channels will be exported.
You can toggle the display of an image channel on or off on the Edit Acquisition page.
Export Batch of Images
You can export a batch of images for publication or presentation.
Select multiple Acquisitions using SHIFT + Click or CTRL + Click.
Click .
In the export dialog, click Browse to find a parent folder for the images and enter a name for a new folder in the Folder Name field. The images will be exported into the new folder, which will be inside the parent folder.
Edit Acquisition
See Edit Acquisition for more information.
Align Channels
For Odyssey CLx and Odyssey DLx Acquisitions that contain multiple images, the placement of one channel image can be adjusted in reference to the other channel image in Empiria Studio and LI‑COR Acquisition.
In the Image Gallery, select the image and click Edit Acquisition.
Click Align Channels.
Ensure the channel you want to move is selected in the Current Channel list.
Click the buttons to move the channel in the Current Channel list by one pixel at a time.
Click Save as New.
Edit Acquisition
On the Edit Acquisition page, you can edit image Acquisitions, including flipping, rotating, cropping, and changing which channels are displayed. The original images are preserved.
To open the Edit Acquisition page from the Image Gallery, double click an Acquisition or select the Acquisition and click Edit Acquisition.
The following options are available on the Edit Acquisition page.
Change Which Image Channels Are Displayed
In the table under the image view, click to stop displaying an image channel.
Click to display a channel that is currently not displayed.
Edit Name or Comment
To change the Name or Comment for the Acquisition, enter new text in the Name or Comment field. Changes are automatically saved.
Changing the Name or Comment metadata does not create a new Acquisition.
Because Acquisitions will have the same image ID before and after modification (cropping, rotating, etc.), renaming the modified Acquisition can help you keep track of it. For example, you could rename "0000342" to "0000342-cropped" after cropping. You can also click above the table to add the Modifications column, which displays the modifications that have been made to Acquisitions.
Crop or Perform Other Transformation
In the Edit as New section, click an option.
The change you make will be applied to all images in the Acquisition.
Click Save as New when you are finished making the change.
A new Acquisition will be created, and the original Acquisition will be preserved.
Free Rotate
The Transform option provides quick options for rotating images 90 or 180 degrees. The Free Rotate option allows you to rotate images in smaller increments.