
The following tutorial can be followed in the lab or field, wherever you happen to be.
Do this first
This section assumes you are familiar with the system and that you have installed the PC software on your computer or the LI-8100APP on your mobile phone.
If you assemble the system in the lab for later deployment in the field, or if you are making continuous long-term measurements, configure the system to automatically restart following a power interruption. See Automatic restart function.
Multiplexed measurement tutorial
You will need a dependable power supply for long term measurements. A solar power supply, deep cycle marine battery, or grid power are recommended for this application.
The multiplexer and chambers are detected by the LI-8100A automatically and the configuration options are activated in the software after the components are connected, so you have to connect everything in order to configure multiplexed measurements. The configuration is pretty straight forward, and once you have one chamber set the way you like it, you can apply that configuration to the other chambers with ease.
1. Install the soil collars and measure the offsets
See Using soil collars for details. Remember that data collected within 24 hours of installation is not to be trusted.
2. Assemble the system and connect to a PC or mobile device
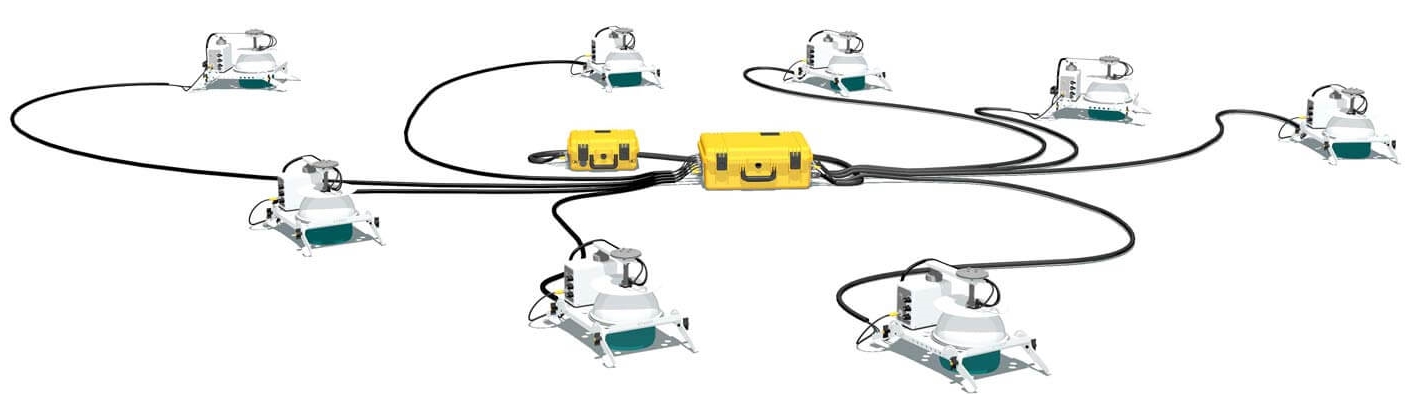
Connect the cables and power up the system (Figure 4‑6). Turn on the multiplexer first, then power up the analyzer control unit. Connect to your computer or mobile device. See Get connected for details.
3. Connect the chambers
See Connecting chambers for details.
Adjust the legs of each chamber so it is even over the soil collar, then record the offset of each chamber. Also insert the soil temperature probe, soil moisture probe, or other sensor for each chamber. If the chambers do not have clearance to open and close freely, adjust the chamber open positions to accommodate the situation (see Changing the long-term chamber open position).
4. Configure the chamber on Port 1
![]()
In the PC Software:
Under Setup > Chamber Measurement (Ctrl+M); Port Setup > Chamber, select Port 1 (typically).
- Chamber: Select the chamber.
- Temp Source: Typically you will use the temperature inside the chamber, so select Chamber.
- Soil Area: 317.8 cm2 for the 8100-104/C Long-Term Chambers.
- Chamber Offset: The offset measured at the chamber.
- Extension Tube Volume: For the 15-meter tube enter 237 cm2.
![]()
In the App:
Under Setup > Areas and Volumes, enter the following:
- Chamber Offset: The offset measured at the chamber.
- Soil Area: Select the chamber to enter the area.
- Chamber Volume: Select the chamber and temperature source (Chamber, typically). Leave Chamber Signals Closed set to on, then tap Send Update.
- Ext. Tube Volume: For the 15-meter tube enter 237 cm2.
The remaining fields are preset. Tap Send Update.
5. Configure the observation
![]()
In the PC Software:
Under Port Setup > Observation, enter a Treatment Label that will be accompany measurements from this chamber in the data file. Configure the other parameters as shown:
- Observation Length: 2 minutes
- Dead Band: 25 seconds
- Pre-purge: 30 seconds
- Post-purge: 45 seconds
![]()
In the App:
Under Setup > Measurement Protocol, enter a Treatment Label that will accompany measurements from this chamber in the data file. Configure the other parameters:
- Obs. Length: 2 minutes
- Dead Band: 25 seconds
- Pre-Purge: 30 seconds
- Post Purge: 45 seconds
Tap Send Update.
6. Select variables to log
![]()
In the PC Software:
Under Port Setup > Data Logging, click Select All unless data storage space is an issue. In that case, you may want to identify the critical variables and log those.
![]()
In the App:
Under Setup > Measurement Protocol, Additional Log Fields: All; or select variables if you have limited data storage space.
Tap Send Update.
7. Configure the auxiliary sensors
If you are logging data from a soil temperature probe, soil moisture probe, or other sensor with voltage output, configure the sensor.
![]()
In the PC Software:
Under the, V2, V3, or V4 tab, select General Purpose Input, Soil Moisture Probe, or Thermistor, and configure the channel.
![]()
In the App:
Under LI-8100A > Auxiliary Inputs, configure the inputs for Volt 2, 3, and 4.
Tap Send Update.
For details on auxiliary sensors, see Connecting auxiliary sensors.
8. Configure the other ports
If the settings for your first port are applicable to the other ports and their corresponding chambers, you can easily copy the configuration to the other ports.
![]()
In the PC Software:
Under Port Tools you can copy the settings from one port to the others.
You can also quickly alter the Treatment Label and Chamber Offset for each chamber under Quick Settings.
Click Apply to send the updated port information.
![]()
In the App:
Under Setup > Areas and Volumes, tap Copy Ports. You can choose to copy the Treatment Labels and Chamber Offsets or not, then Proceed to Port Selection. Select the configured port, and then specify which ports to receive the configuration.
Tap Send Update.
Now you may wish to update the Chamber Offset and Treatment Label for the other ports under Setup > Measurement Protocol.
9. Set the port sequence
![]()
In the PC Software:
Under the Port Sequence tab, the default sequence progresses from port 1 to port 16 in order. Click Use as Sequence to set the sequence quickly. If you want to customize the order, simply key in the order you prefer, with digits separated by commas.
![]()
In the App:
Under Setup > Start Measurement, tap Port Sequence alter the sequence by keying in the order you prefer, with digits separated by commas.
Tap Send Update when done.
10. Set the repeat time
A repeat time of 1 hour will provide 24 measurements per day.
![]()
In the PC Software:
Under the Repeat tab, enter the time that you want between measurement sequences and the number of repeats. Set as many repeats as you want - for long-term continuous measurements, click Set to Max.
![]()
In the App:
Under Setup > Start Measurement, tap Repeat Meas and enter the time you wan between measurements. Set as many repeats as you want - for long-term continuous measurements, set the time you want.
Tap Send Update.
11. Start the measurement
![]()
In the PC Software:
Under Chamber Measurement click Start Measurement.
Use Preset: Current Settings
Specify a Measurement File, Settings, and specify a Destination.
Choose the start time (immediately, or at a defined date and time).
Click the Start Measurement button.
![]()
In the App:
Under Setup > Start Measurement enter a File Name and Comments and change the Port Sequence if desired.
Specify a Log To destination and Start Time.
You can alter the repeat sequence too.
Tap the Start button.
Now the system should be running as specified, so just let it run until it is done. After the system has recorded data for some time, you'll want to retrieve your data. See Transferring data from the LI-8100A to learn how.
12. Process the data in SoilFluxPro software
Process your data in SoilFluxPro™ software (formerly FV8100) for PC or Mac. SoilFluxPro is an essential part of the LI-8100A system.
Get it free from http://www.licor.com/products/soil-flux/software.html.
Below is a checklist of things that you should do prior to making measurements. The checklist will not take long to address, and can save you a lot of time and frustration later.
- Instrument Time: Set correctly?
- Leak Test: Checked and OK?
- Soil Temperature Probe: Connected and responding?
- Soil Moisture Probe: Connected and responding?
- Soil Collars: In place for at least 12 hours?
- Soil Collar Area: Entered in the software (PC only)?
- Soil Collar Offset: Prepared to measure and enter in the software?
- Pre-purge: Set to at least 30 seconds?
- Post-purge: Set to at least 45 seconds?
- Dead Band: Configured for 10 to 20 seconds?
- Chamber Purge Period: Entered in the software?
- Automatically Restart After Power Interruption: Set as desired?