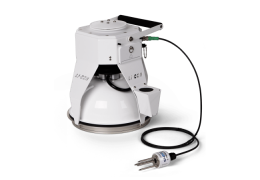
This section describes how to connect with the Smart Chamber using a computer or mobile device and take a basic measurement.
Connecting a PC or mobile device to the Smart Chamber
You can connect to the Smart Chamber with a wireless network (Wi-Fi), a wired network connection, or a wired USB connection.
Wireless network connection
Each Smart Chamber ships with Wi-Fi enabled and requires only a few steps to connect. This procedure can be performed with a computer, tablet, or smart phone in the Chrome, Safari, or Firefox web browsers.
- Power on the Smart Chamber.
- Connect your computer or smart phone to the Smart Chamber Wi-Fi network
- Follow the standard procedure for identifying Wi-Fi networks on your computer or mobile device.
-
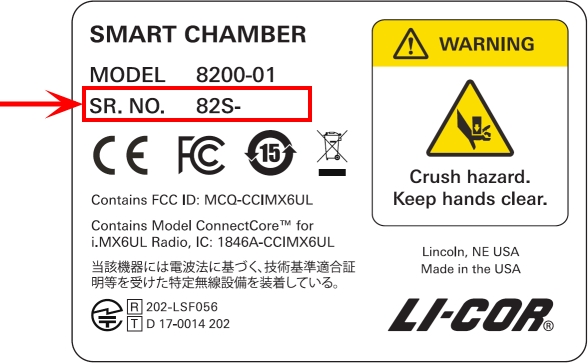
- Network Name: Smart Chamber Serial number (like 82s-nnnn)
- Password: licorenv
- If you are unable to find the Smart Chamber Wi-Fi network, Wi-Fi may be disabled (see Enabling and disabling Wi-Fi (software)).
- Enter the hostname or IP Address in a web browser address bar
- One of the following will work.
-
- Hostname: Enter http://82s-nnnn.local, where 82s-nnnn is the hostname (the serial number) of your Smart Chamber.
- Alternate Hostname: Some Android OS devices do not support multicast Domain Name Service (mDNS). You may need to enter the hostname in this format instead: http://82s-nnnn.sc.licor.com.
- Fixed IP address: Enter http://192.168.46.1. This fixed IP address is used by every Smart Chamber when the internal Wi-Fi is enabled.
The Smart Chamber interface will load in the browser window.

Wired network or USB connection
You may need to connect with a wired network connection, if for example, Wi-Fi is not allowed or you accidentally (or intentionally) disable Wi-Fi. With a wired network connection, you can configure Wi-Fi settings and operate the Smart Chamber normally.
- Power on the Smart Chamber.
- Install a network or USB cable.
- The network cable connects the Smart Chamber to a vacant port on your network or directly to your computer's network port. The USB cable goes between the USB device port and a USB port on your computer.1
- Enter the hostname (the serial number) in a web browser address bar.
- Enter http://82s-nnnn.local, where 82s-nnnn is the hostname (and the serial number) of your Smart Chamber.
The Smart Chamber interface will load in the browser window.
Disabling Wi-Fi (hardware only)
If Wi-Fi is not permitted in your country, you will need to disable it. To disable internal Wi-Fi, simply insert a USB Wi-Fi adapter into the designated USB-A port under the power button. The internal Wi-Fi will automatically be disabled. It will then remain disabled until it is re-enabled in the software interface (a wired network or USB connection is required). You can also control the Wi-Fi setting in the software.
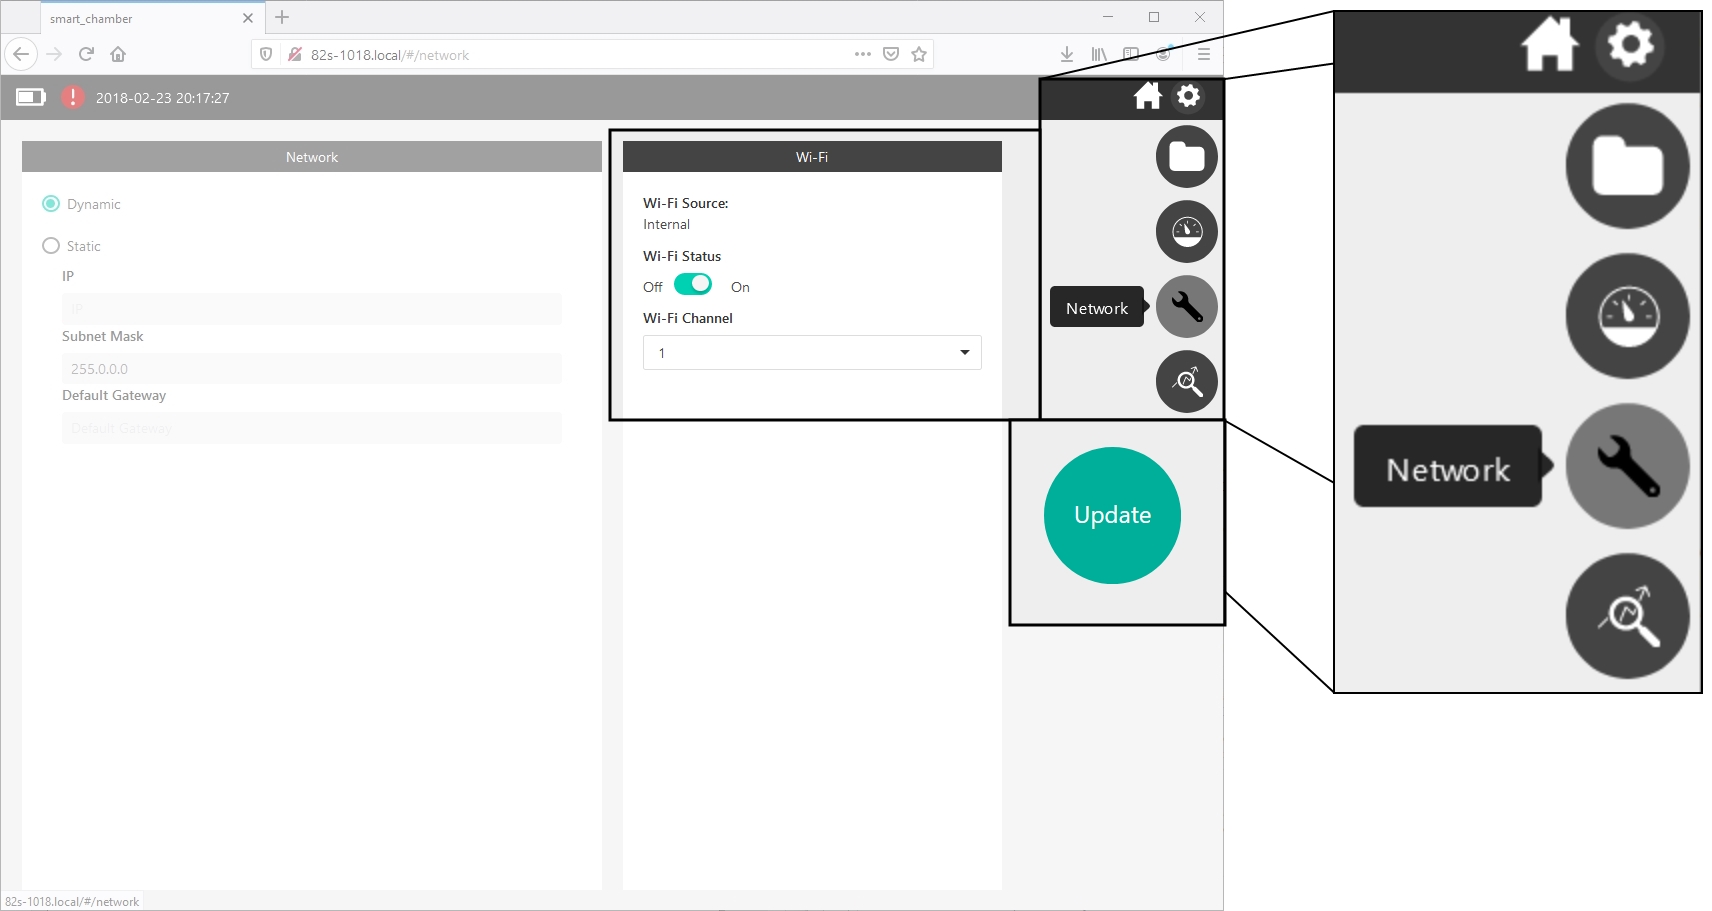
Enabling and disabling Wi-Fi (software)
You can configure the Smart Chamber Wi-Fi settings through the software interface.
- Connect the chamber to a computer using the network or USB-B cable (see Wired network or USB connection).
- View network settings.
- Under Wi-Fi Status, set it to On or Off and click Update to apply the setting.
Setting the time zone
Before starting a measurement, check and set the time zone. You only need to do this the first time you use the smart chamber or any time you go to a different time zone. This will ensure that the data have the correct time stamp for your location. In the Settings screen, under Timezone, select the zone for your area.
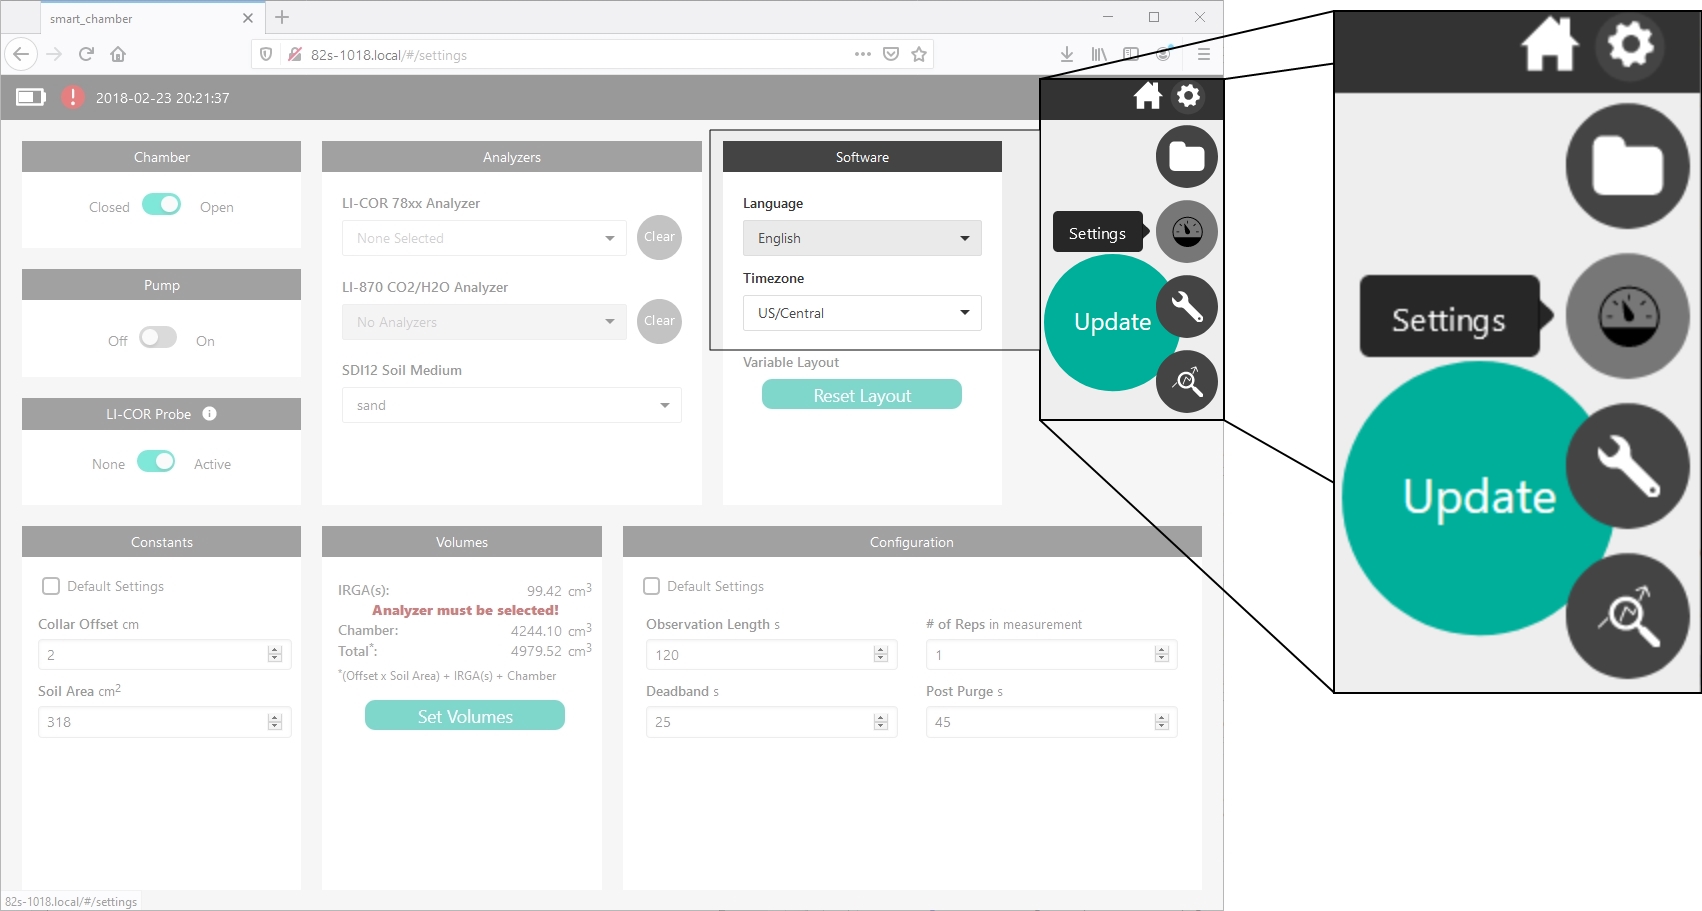
Click or tap the Update button to store the setting.

Checklists
Review the Preparations checklist and Measurements checklist before starting your field work.
Preparations checklist
Plan your field work in advance so that you are ready to go when the day for your field work arrives. Complete this checklist one day or more in advance of your field work.
- Soil collars in place for at least 6 hours, but ideally 24+ hours before measurements? See Installing soil collars.
- Gas analyzer tubing connected to Smart Chamber? Volumes known?
- For the LI-7810 or LI-7820, see Connecting an LI-7810 or LI-7820 Trace Gas Analyzer.
- For the LI-870, see Connecting an LI-870.
- For other gas analyzers, see Using analyzers from other manufacturers and Determining effective volume.
- To subsample, see Using the trace gas sampling kit and Total system volume.
- Batteries charged or charging? Batteries.
- Soil types known (HydraProbe only)?
Measurements checklist
At the beginning or your field day, review this checklist. As you get more experience with the Smart Chamber, you'll know which items need attention and which can be ignored.
- Gas analyzers warmed up and reporting data to the Smart Chamber? Go to the Smart Chamber home page, Click to Set a CO2, CH4, N2O, or H2O variable from the gas analyzer, and make sure it is reading reasonable values.
- Time zone set? See Setting the time zone.
- Soil probe or HydraProbe connected? See Connecting soil probes.
- For home-made soil collars only (if internal area is different from LI-COR collars), are the areas known to you? Otherwise, the software default settings are correct.
- Ready to measure soil collar heights? If collar heights are the same for all collars, you only need to measure one. If they are different, you need to measure and enter each one. Bring a ruler with your field kit.
- Extra charged battery in your field kit?
- Snack to eat and water to drink? It'll be a good day of data collection.
Measurement tutorial
The steps presented here outline the general workflow for configuring and starting a measurement.
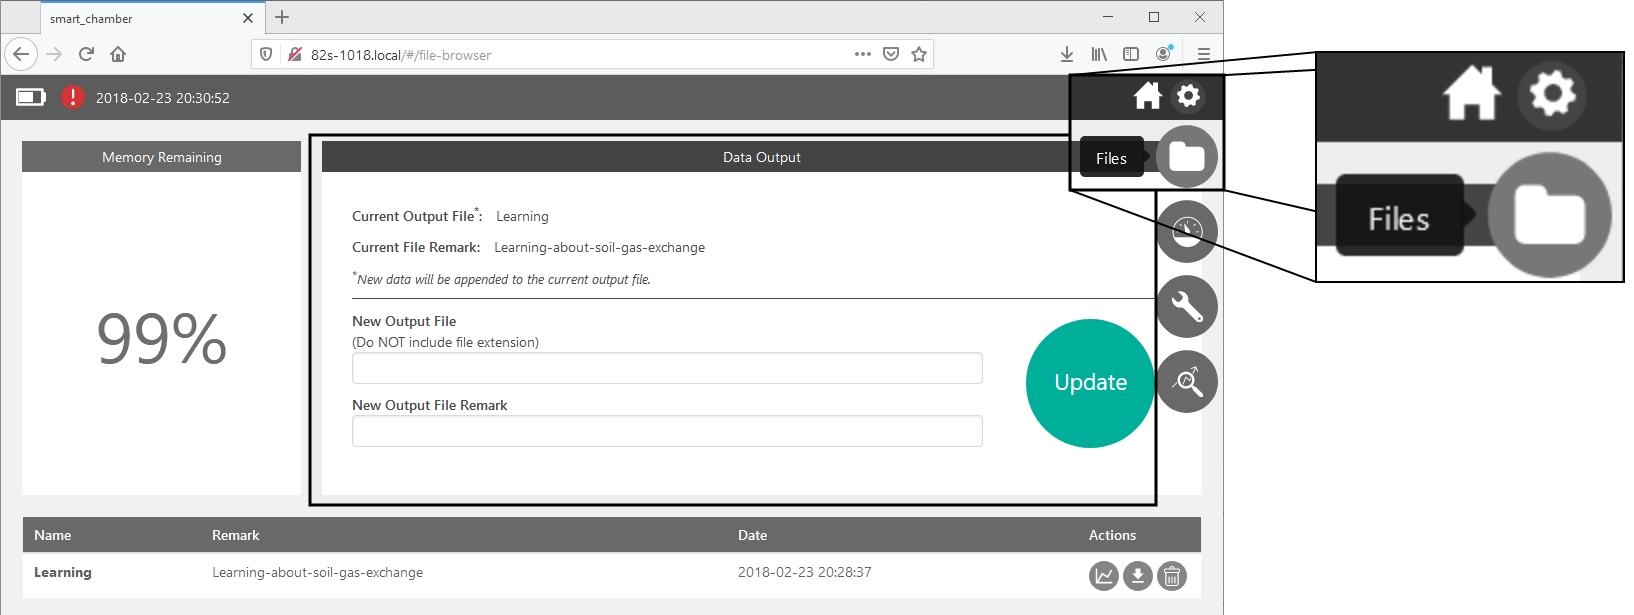
Connect to the Smart Chamber with your computer or mobile device (see Connecting a PC or mobile device to the Smart Chamber). Tap the Files button to view data files on the Smart Chamber. The Smart Chamber will automatically open the previous data file when it is powered on. In this case, however, you're creating a new file, so enter a name in the field called New Output File. Enter a remark if desired. Tap Update ( ) to open the new data file.
2. Connect with the gas analyzers
Be sure the gas analyzer cables and tubing are installed and then go to Settings to select an analyzer. Under Analyzers, select your gas analyzers from the lists.
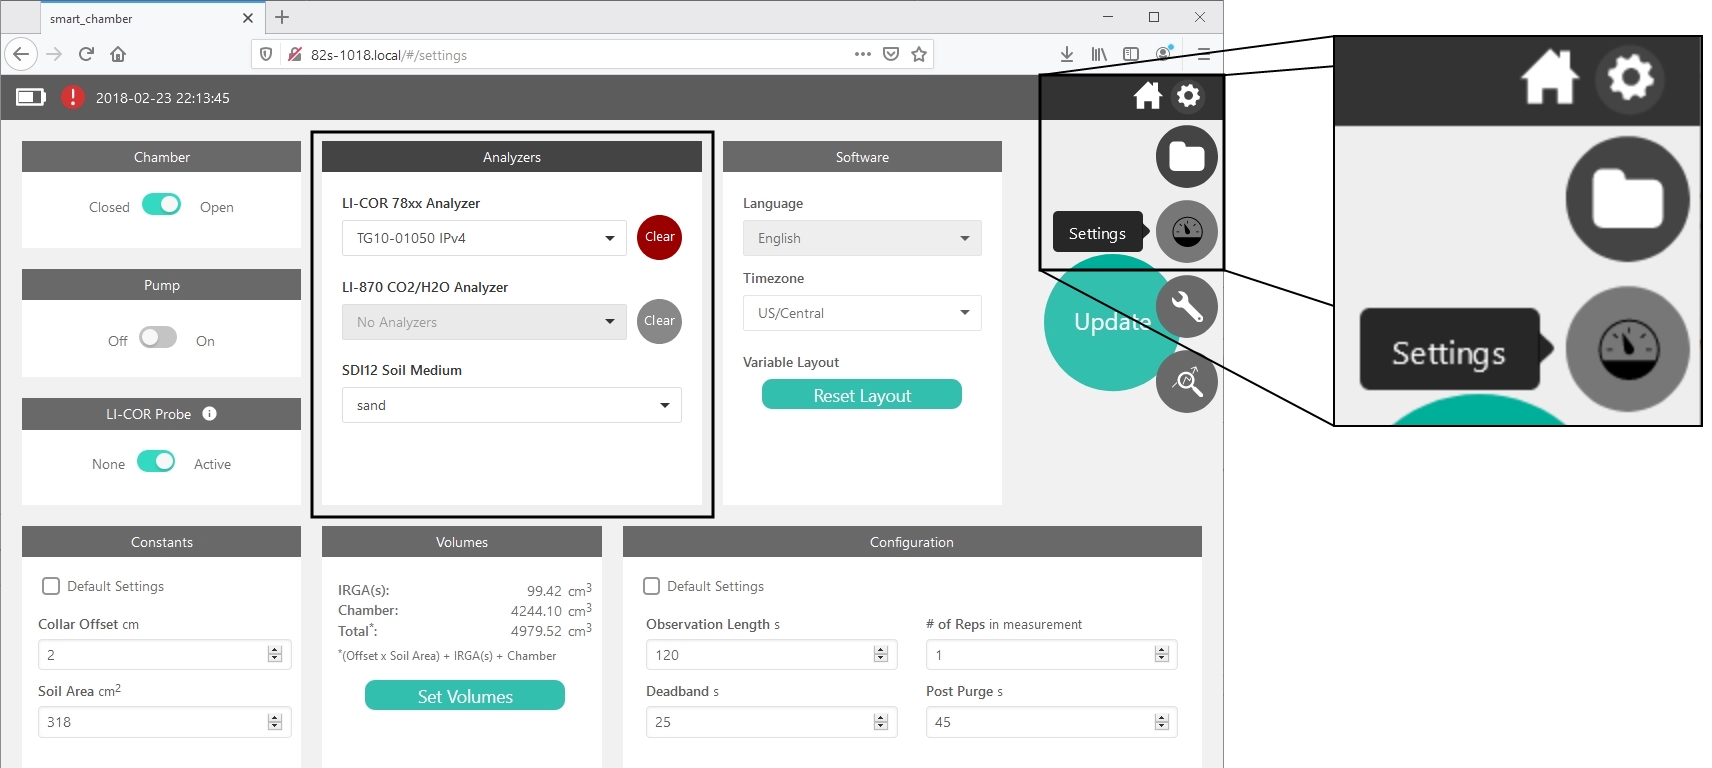
If no analyzers are listed, the Smart Chamber is probably on a different network than the gas analyzer. If you have previously connected to a Trace Gas Analyzer and you want to connect to a different one, click Clear first to disable the existing connection.
In the Settings page, complete the following:
- Set the Constants:
-
- Collar Offset cm: The value entered here will be the default value. You can change it with each measurement.
- Soil Area cm2: This is the area inside the collar. For LI-COR soil collars, the default area is 317.8 cm2. For a home-made collar, enter the area.
- Check the Volumes:
- Click Set Volumes and select a one-directional tube length (for a LI-COR Trace Gas Analyzer, select either 1.2 or 2 m; for the LI-870, the length is 1.2 m). The software accounts for both pieces of tubing and computes the volume automatically. If you have altered the volume of the system, you will need to enter different volumes to compute accurate results. Check Auto-fill Volume for each option to restore the default values. The volume of the chamber is 4244.1 cm3.
- Set the measurement Configuration.
- The default values are recommended for a typical CO2 and CH4 measurement. You may need to use other settings in some circumstances.
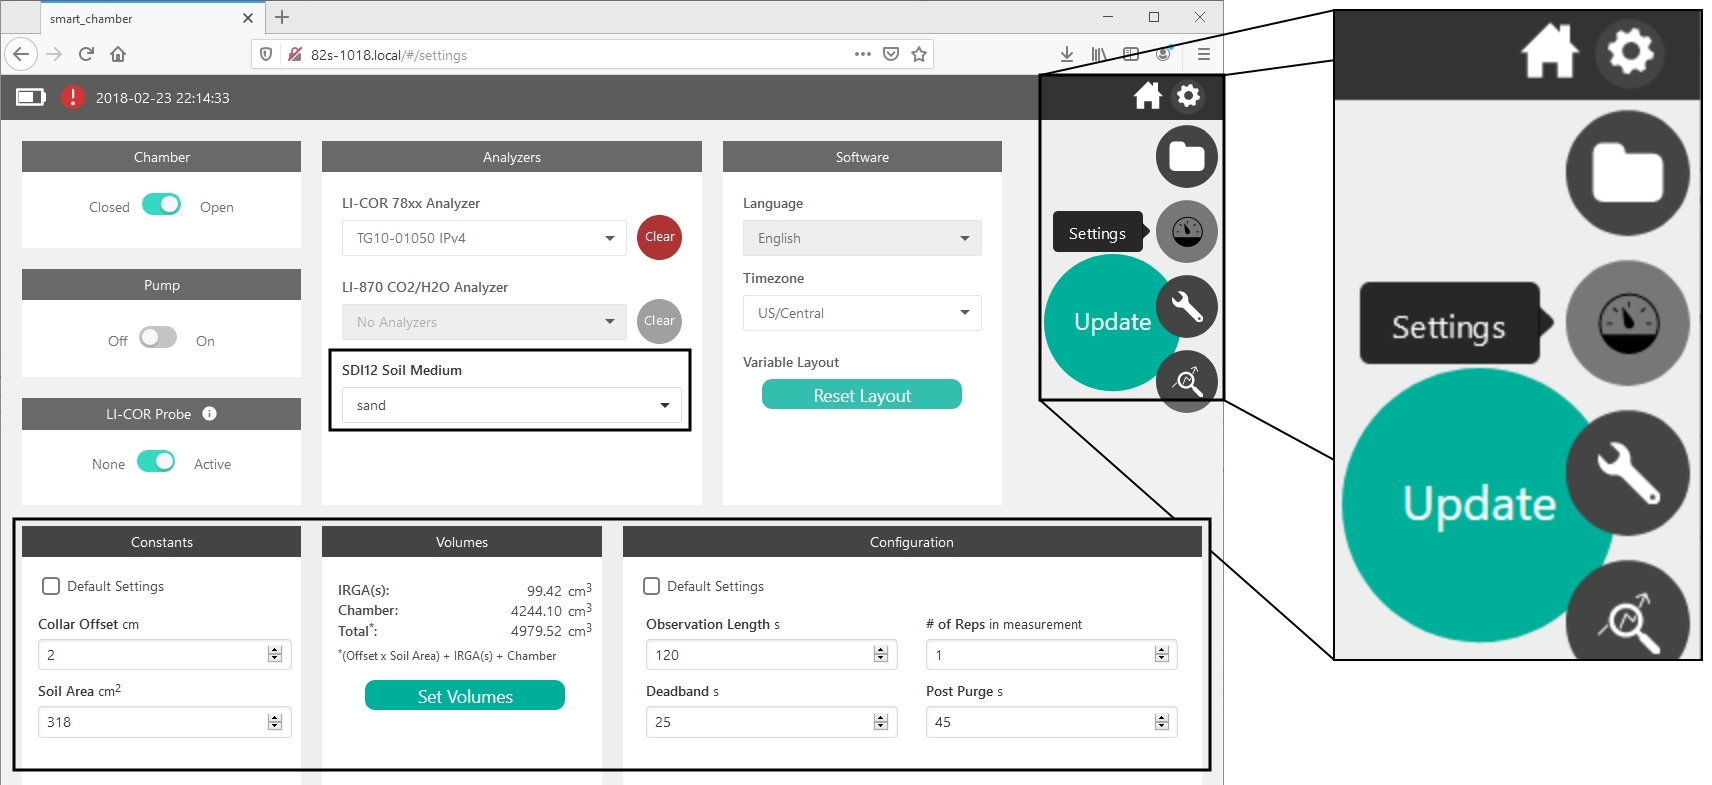
- See Soil gas flux measurement theory and The Settings page for details on these fields.
- Set the Soil Medium if using a Stevens HydraProbe with serial number lower than 268000. (Newer models use a generic calibration that is suitable for a range of soil types.)
- Tap Update () to save the settings.
4. Confirm the configuration
Go to the Smart Chamber home page, Click to Set a CO2, CH4, N2O, or H2O variable from the gas analyzer, and make sure it is reading reasonable values. Check the temperature, pressure, soil moisture, and soil temperature measurements to be sure everything is working as expected.
5. Start the measurement
Place the Smart Chamber on a collar. Insert the soil probes into the soil. Return to the home screen and tap the large Start button to initiate the measurement.
- Verify that the Collar Offset is correct. Enter a different value if needed.
- Edit the ID Tag. This simply identifies each measurement.
- Check Auto-Increment ID Tag to automatically give each measurement a sequential identifier. Clear the check mark to make the ID tag editable.
- Enter an ID Remark. The remark will be associated with this measurement.
- Review the Connected 78xx, Connected LI-870, and the Output File. If any of these fields need to be changed, cancel the measurement to make changes.
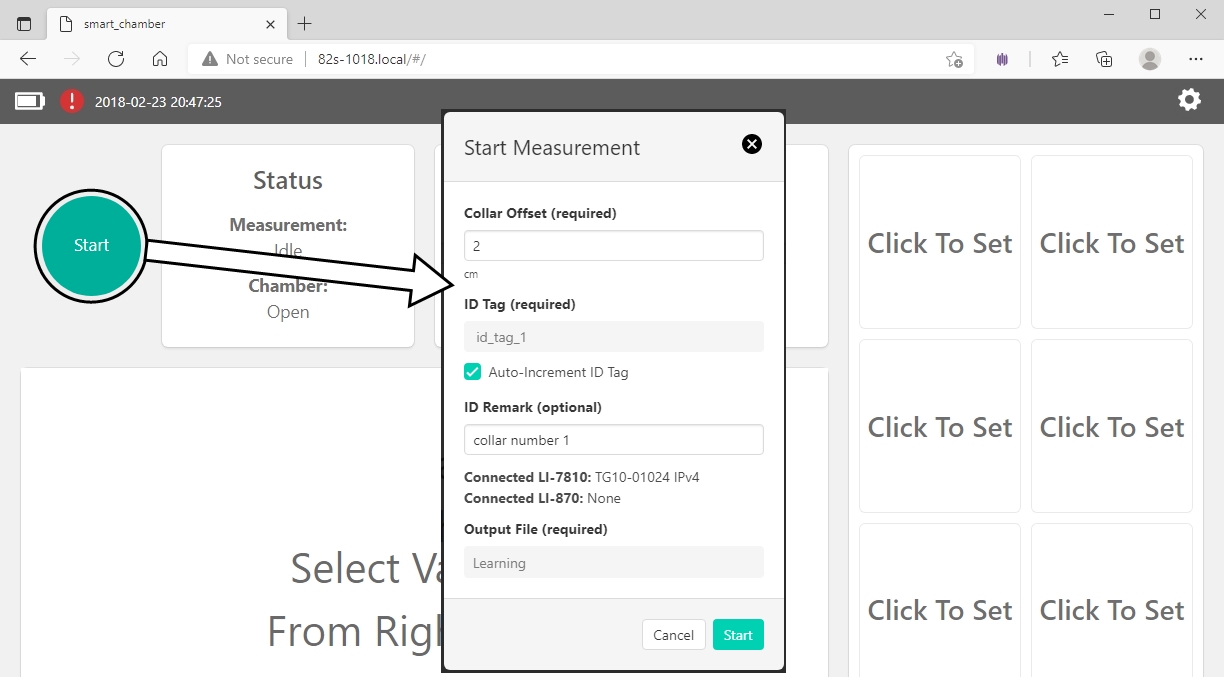
6. Tap Start
The measurement will proceed automatically. Depending on which variables you have selected in the right-hand portion of the Home screen, you can view data values as they are logged.
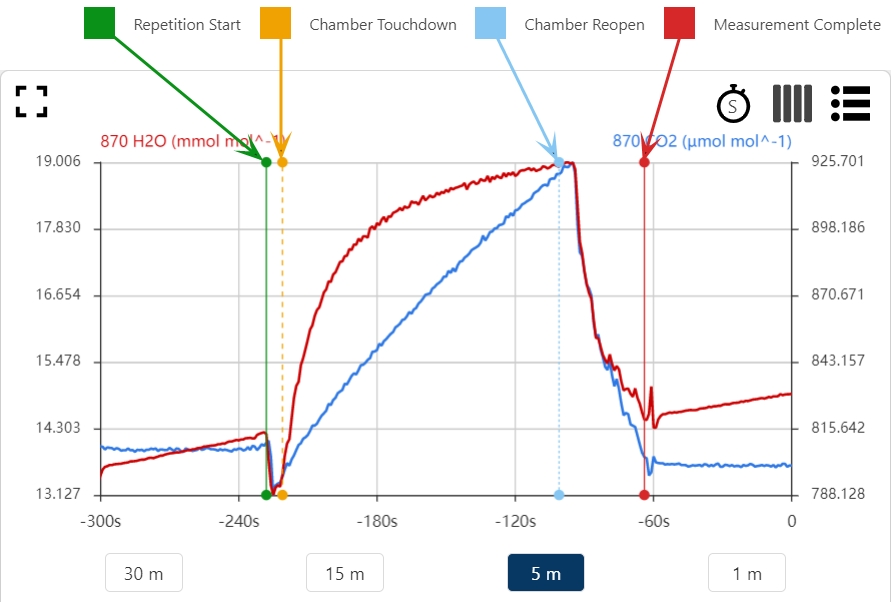
The colored bars in the graph correspond to the following time points of your measurement (in order from left to right). The names in parentheses correspond to the legend that can be viewed in the Smart Chamber software:
- Solid Green: Chamber begins closing (Repetition Start).
- Dotted Orange: Dead band starts (Chamber Touchdown).
- Dotted Blue: Chamber begins opening, post-purge begins (Chamber Reopen).
- Solid Red: Post-purge ends for final repetition (Measurement Complete).
At the completion of a measurement (one or several repetitions), pick up the chamber and soil probes and continue to the next collar. Repeat steps four and five until you have collected all of your data.
Smart Chamber volumes
The Smart Chamber software will compute and populate the system volumes automatically based on the components that are selected in the interface. It may include either the 1.2- or 2-meter cable/tube bundles, or both if you are using multiple gas analyzers. Table 3‑1 gives volumes for recommended configurations. If you use a different combination of tubes, you may need to compute custom volumes.
| Component | Volume (cm3) | LI-870 | LI-78xx | LI-870 + LI‑78xx |
2× LI-78xx |
|---|---|---|---|---|---|
| Smart Chamber | 4244.1 | ✔ | ✔ | ✔ | ✔ |
| Soil Collar (317.8 cm2 × default2 2 cm offset) |
635.6 | ✔ | ✔ | ✔ | ✔ |
| LI-870 CO2 Gas Analyzer |
33.5 | ✔ | - | ✔ | - |
| 1.2 m Cable Bundle (2.4 m of tubing3) |
18.96 | ✔ | - | ✔ | - |
| LI-78xx Trace Gas Analyzer |
28 | - | ✔ | ✔ | ✔✔ |
| 2.0 m Cable Bundle (4.0 m of tubing) |
31.6 | - | ✔ | ✔ | ✔✔ |
| T-Fitting (60 cm of tubing) |
4.7 | - | - | ✔ | ✔ |
| Total (cm3) | 4932.2 | 4939.3 | 4996.5 | 5003.6 |