Calibrating the TGA
TGA calibrations panel is shown in Figure 12‑42.
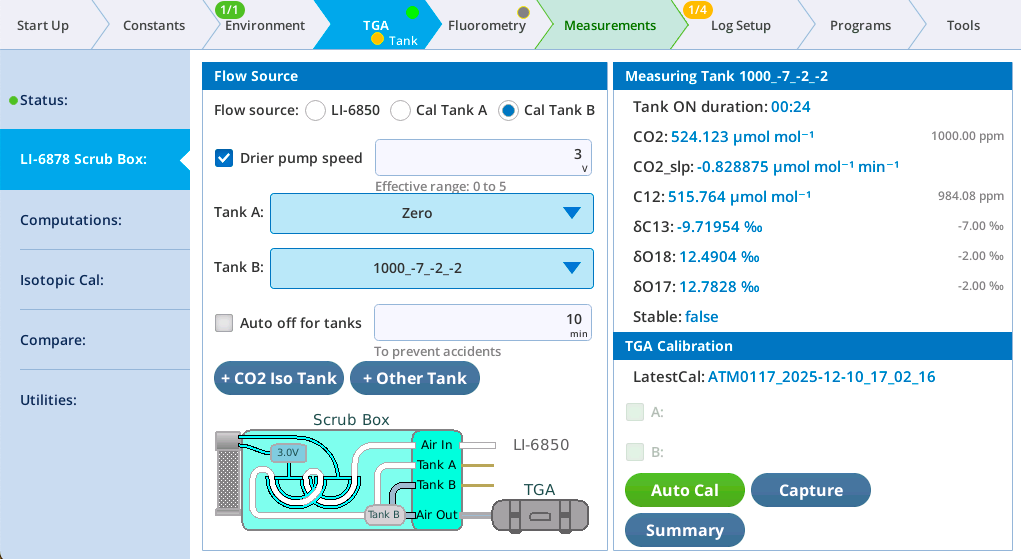
The first step in the calibration process is to identify the tank(s) that you are using. This is discussed below in Adding tanks. Once the appropriate tank(s) have been added, three sorts of calibrations are available:
-
Zero: Requires a zero-tank, described in Zeroing the TGA.
-
Span: Requires one span tank, or
-
Span and Offset (Isotopes for LI-7825/LI-8825): Requires two span tanks (reasonably separated in concentration). Either can be done using Manual or Automated.
The span tank calibrations, whether manual or automatic, separate the entire process into two basic parts:
-
Capture a Tank Measurement. These are automatically named with a TM prefix (e.g. TM0123), and stored in the file system for future reference.
-
Apply one (span) or two (span and offset) tank measurements to the TGA; the LI-6800 computes the coefficients, and uploads them to the TGA. Applied tank measurements are named with an ATM prefix (e.g. ATM0011), and also saved in the file system.
TM and ATM files leave a "paper trail" for documenting TGA drift and calibration history. For more details about these files, see Calibration files.
Note that TM files represent the "before" condition, even if used to recalibrate the TGA. By separating the two steps, it allows the decision to adjust the calibration to be made after the measurement is taken, not before.
Tank measurements and calibration info can also be included in logged data files. This is discussed next.
Calibration data groups
There are two TGA calibration related data groups that can be optionally included in logged data files: TGA_Tank (TGA_tank) has a summary of the most recent TM file, and TGA_unitcal (TGA_unitcal) contains the relevant calibration coefficients presently used by the TGA unit.
Tank measurements and calibrations (TMs and ATMs) can also happen automatically as part of a data collection background program (BP). This is described at the end of this section (Background program tools for TGA). This ability, along with logging the TGA_data and TGA_unitcal groups, can be used to integrate the TGA cal and drift performance into your data files.
Adding tanks
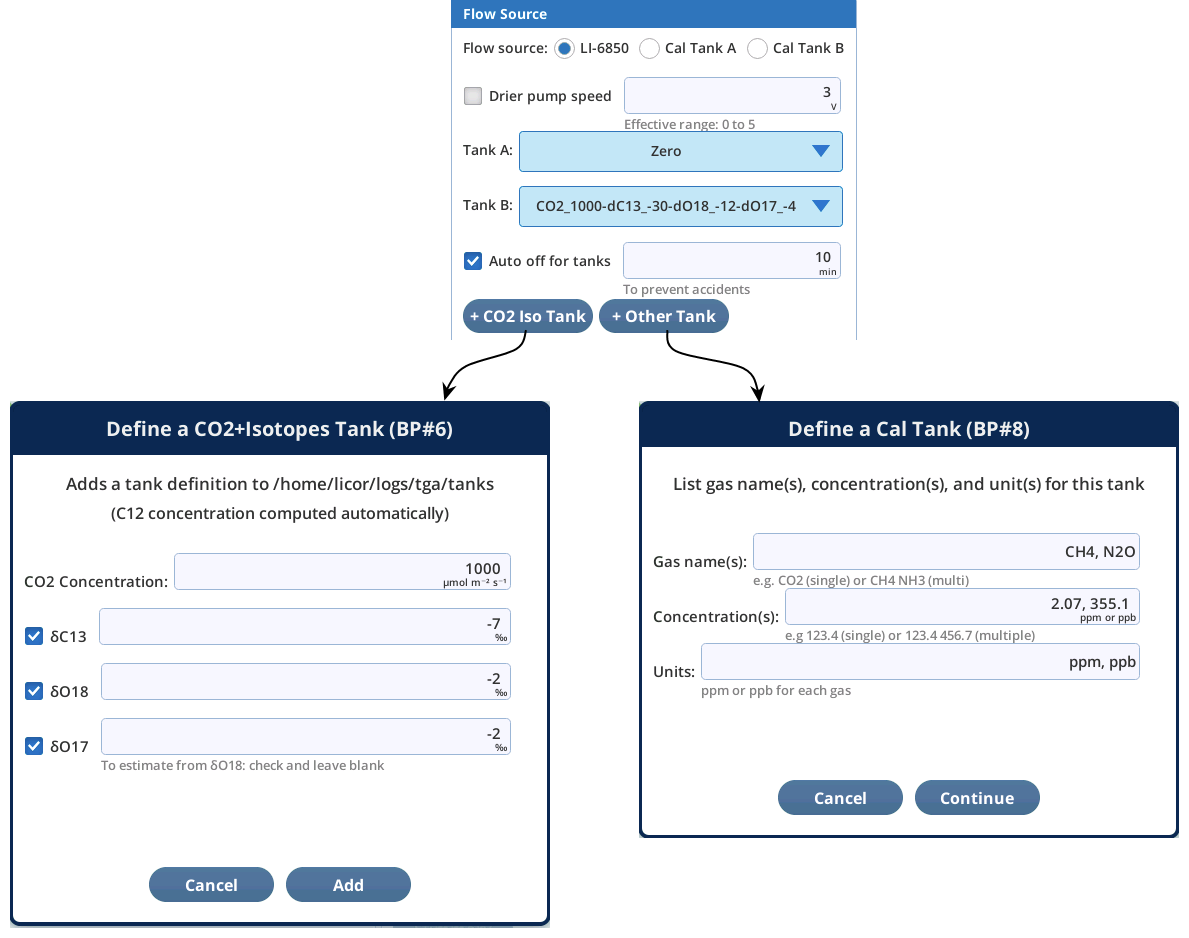
The +CO2 Iso Tank button (for CO2 isotope tanks), and the + Other Tank button (for everything else), let you add a tank to the list of choices presented in the drop down menus (Figure 12‑43).
Isotopic tank considerations
If you don’t know one of the concentrations in a tank, clear the box. Note: δO17 can be estimated [1] from δO18 by
12‑1δO17 ≈ 0.528 × δO18
You can calculate it yourself or let the software do it for you by leaving the δO17 entry blank, but checking the box.
Isotopic concentrations are computed from the tank inputs following Griffith (2018) [2].
12‑2

12‑3
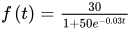
12‑4

12‑5
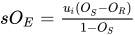
where CO2 is the total CO2 concentration, and 13r, 17r, and 18 are the isotope ratios of the minor to major isotopes:
12‑6

12‑7

12‑8
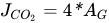
and
12‑9

Standard tank considerations
The dialog can handle single or multiple concentrations in the tank. For more than one concentration, separate the gases by commas and the concentrations by commas.
When a tank is measured, only the overlap between gases measured by the TGA in use and the gases in the tank are considered.
When you specify the concentration and units of a tank, you can do so in the most convenient units - you do not need to match units here with the units that happen to be used in the TGA. When a tank is measured, the tank units are converted if necessary to the units in the TGA_stats group when differences are computed.
Tank Names
Tanks are named automatically for the (integer) values specified. For example, the upper right example in (Figure 12‑43) would be named
CH4_2ppm-N2O_355ppb
and the upper CO2 isotope example on the left would be named
CO2_1000-dC13_-7-dO18_-2-dO17_-2
Tank Files
Tanks that you define are stored in /home/licor/logs/tga/tanks as json files. The file name uses the automatic name with .json appended.
Housekeeping (e.g. removing unwanted files) can be done using the file browser in Log Setup > Open a Log File, navigating to the tanks directory, and selecting one or more files, and using the Delete button. This moves them to the trash, so they are recoverable. An example tank file is shown in Listing 12‑1.
Zeroing the TGA
When a tank port is selected that has Zero for its name, the interface presents a TGA zeroing option (Figure 12‑44):
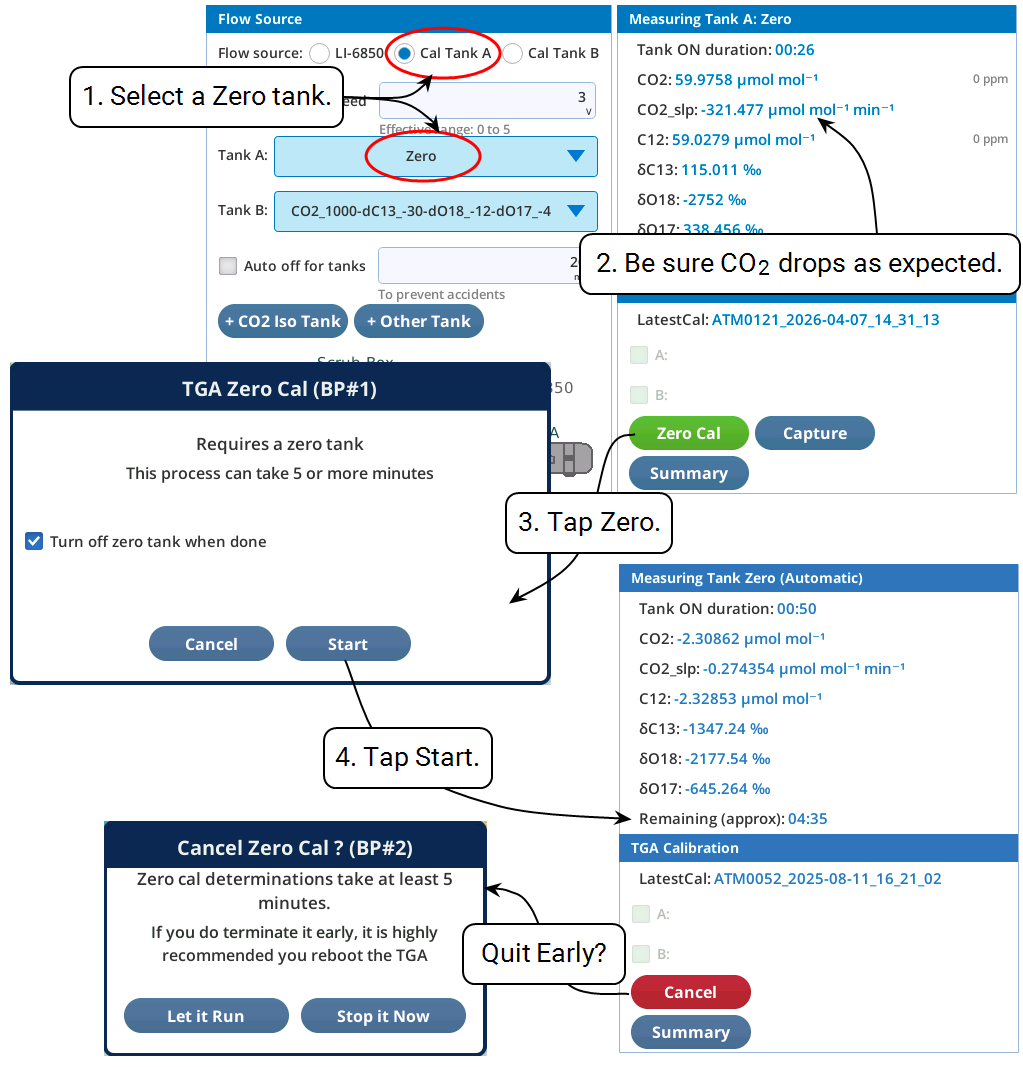
If you wish to capture a 'before' state of the TGA’s calibration in a TM file, tap the Capture button once the readings have stabilized. This can be before or up to a few minutes after you tap the Zero button.
To capture an 'after' state, wait at least the average time that you have set after the cal is done. If you had checked the Turn off zero tank when done button, you’ll have to turn the gas back on for this, of course.
Span tank calibrations
Span calibrations can be done manually or automatically.
Manual
If you want to capture the TGA readings before you adjusted the zero, you can tap Capture to save the zero to a TM file. You can do the same thing after zeroing if you want to capture the TGA readings after zeroing. This is useful if you want to become familiar with the zero drift characteristics of your TGA.
Figure 12‑45 illustrates how to manually calibrate the TGA with one or two span (non-zero) tanks.
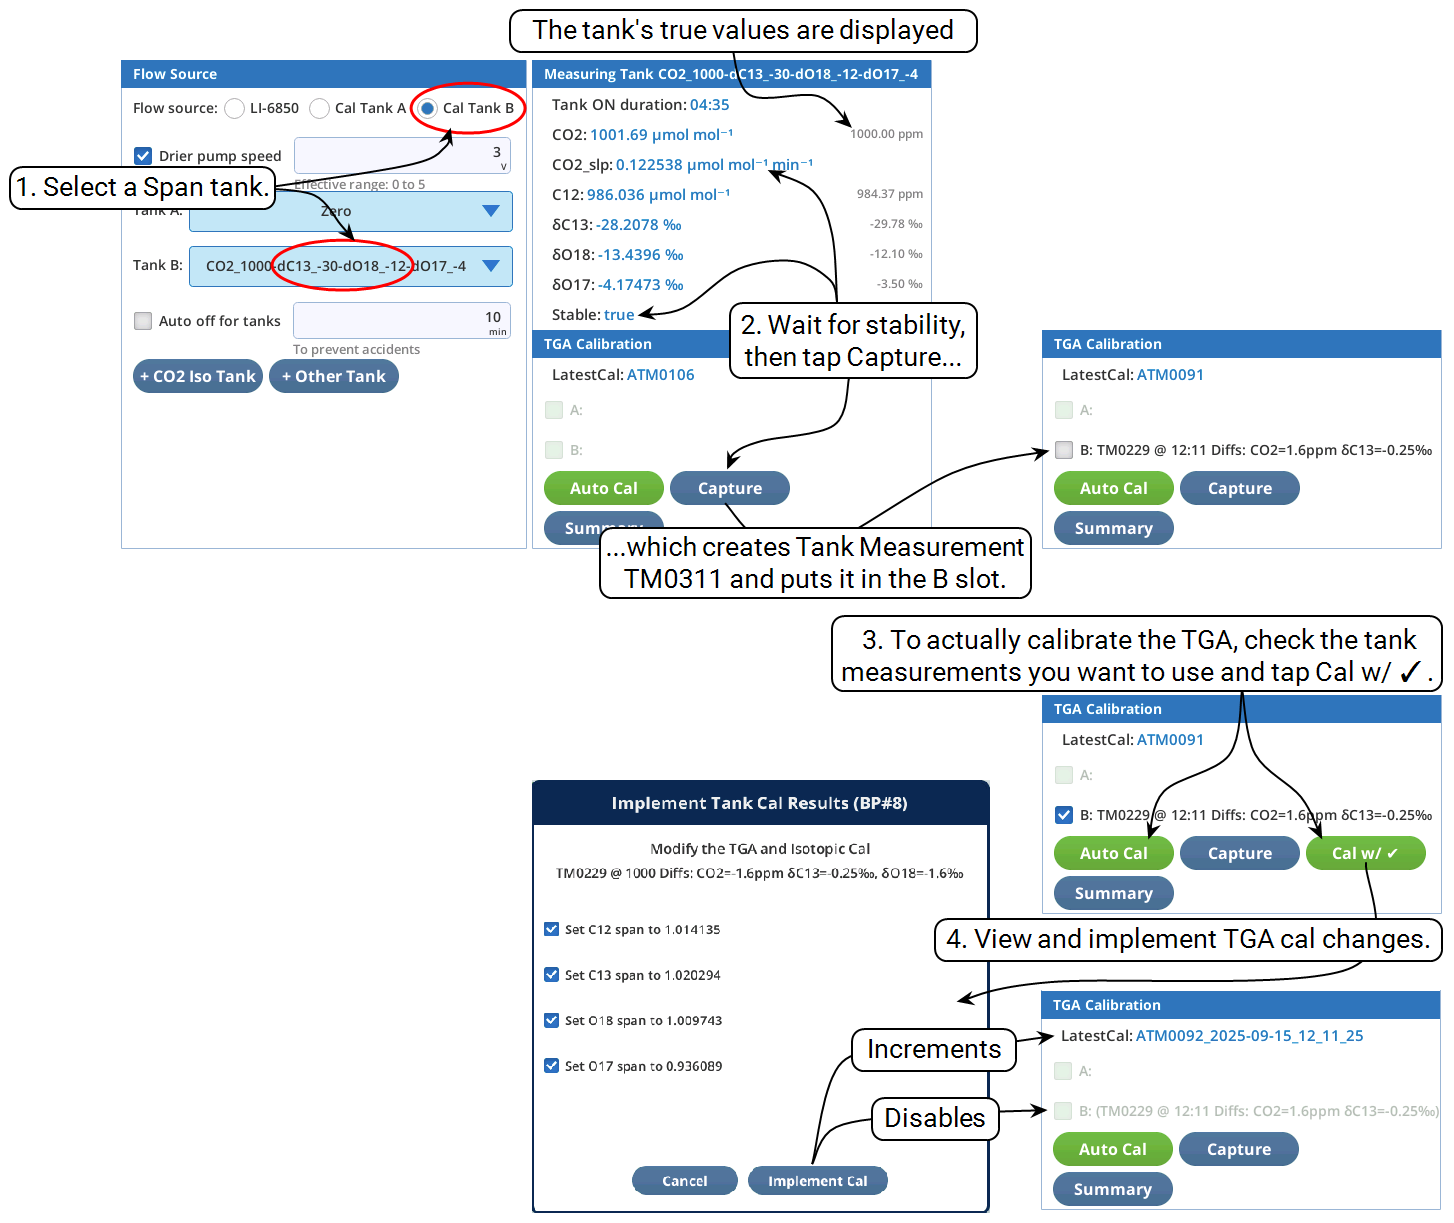
Tank Measurements consist of the tank concentrations and the TGA measurements (stats group) at the time of capture. They are named sequentially, and are stored in /home/licor/logs/tga/tanks/events/<serial>. The latest TM for each non-zero tank is displayed here as a checkbox, for potential (one-time) use for a TGA calibration (Step 4 in Figure 12‑45).
Automated
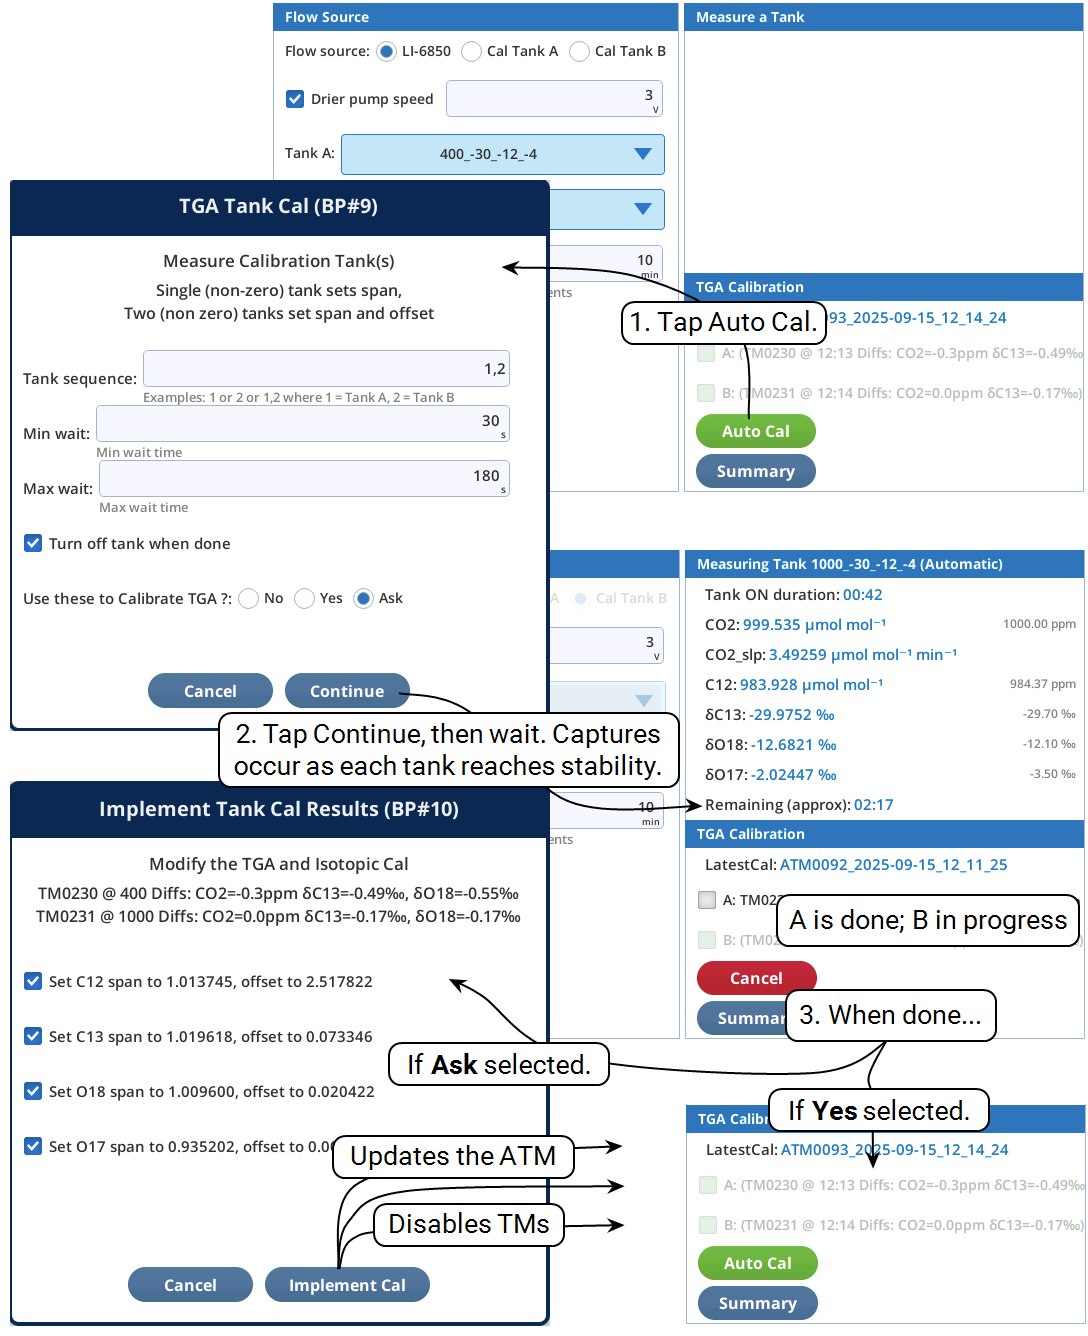
Figure 12‑46 illustrates how to do an automated calibration, this time using two tanks. You can start from anywhere, in terms of what port is selected; specified tanks are automatically selected when needed.
Getting TM summaries
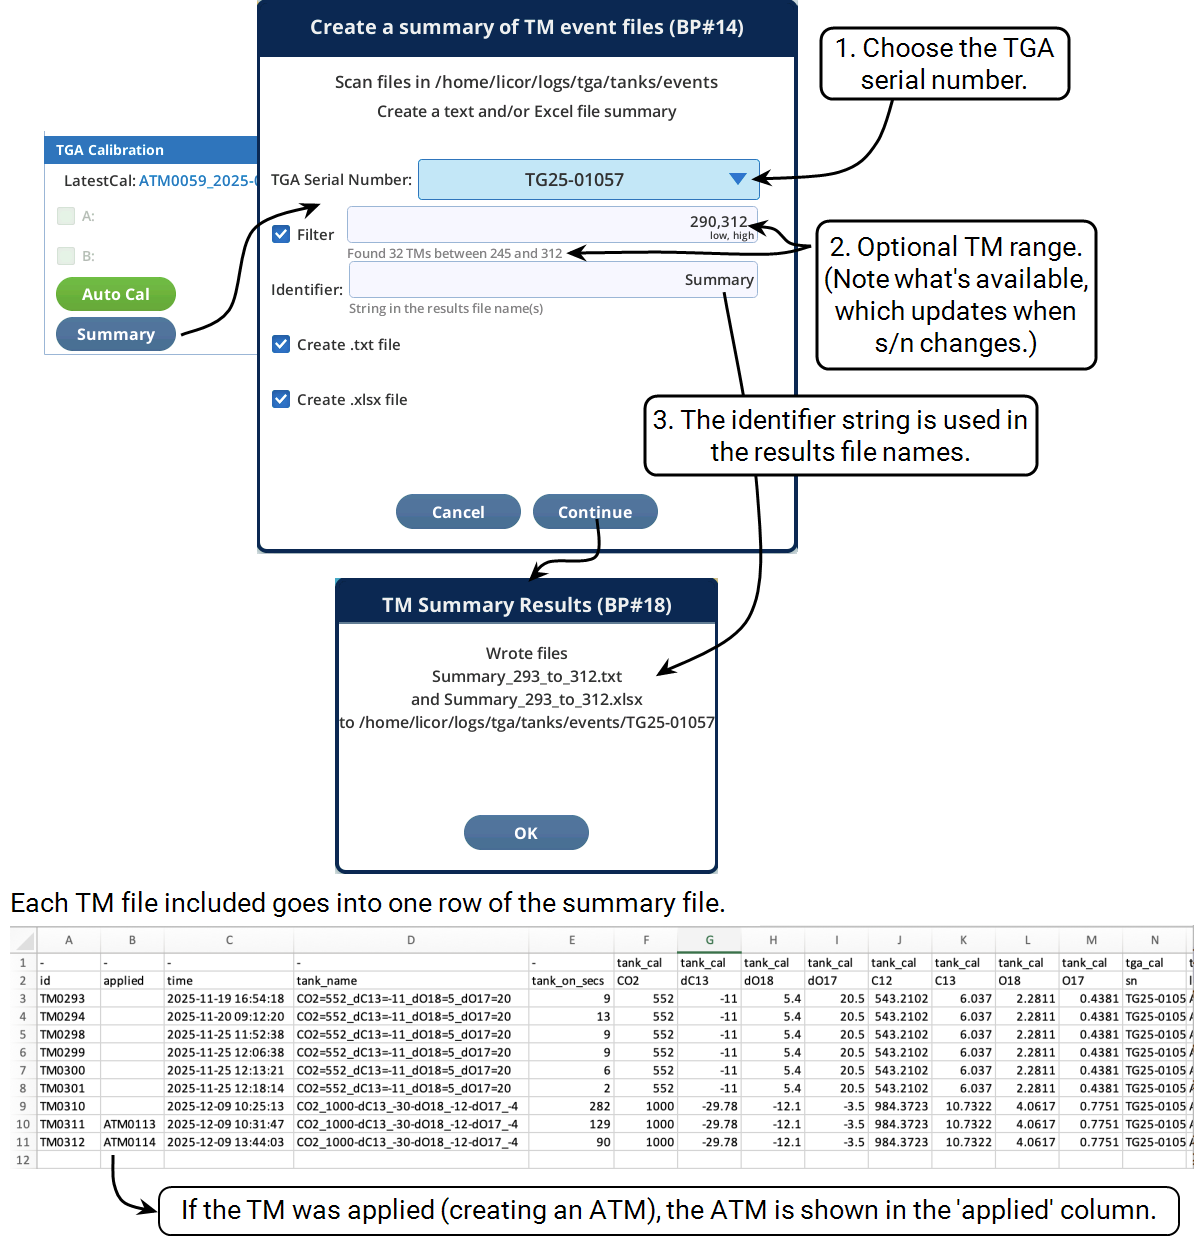
Text or Excel file summaries of TM files are available by tapping the Summary button (Figure 12‑47).