Scan a Chemiluminescent Membrane
See the links on the
See the links below for emission/excitation data and example detection labels.
Scan a Membrane on the Odyssey M Imager
Once connected, click Membrane on the Choose Assay page to begin imaging chemiluminescent membranes.
The following imaging settings are used in this workflow. Other settings can be entered in the Custom workflow.
Resolution: 100 µm
Focus Offset: 0.00 mm
Acquisition times:
Click the button to enter a custom acquisition time from 5 seconds to 60 minutes.
Set Scan Area
Draw a Scan Area to indicate which part(s) of the scan surface should be imaged. To acquire images of multiple places on the Scan Surface, draw multiple scan areas.
Chemiluminescent blots must be placed within the Chemi Area on the scan surface. Scan Areas for chemiluminescent blots must be drawn within the Chemi Area on the Set scan area page or the chemiluminescence detection option will not be available.
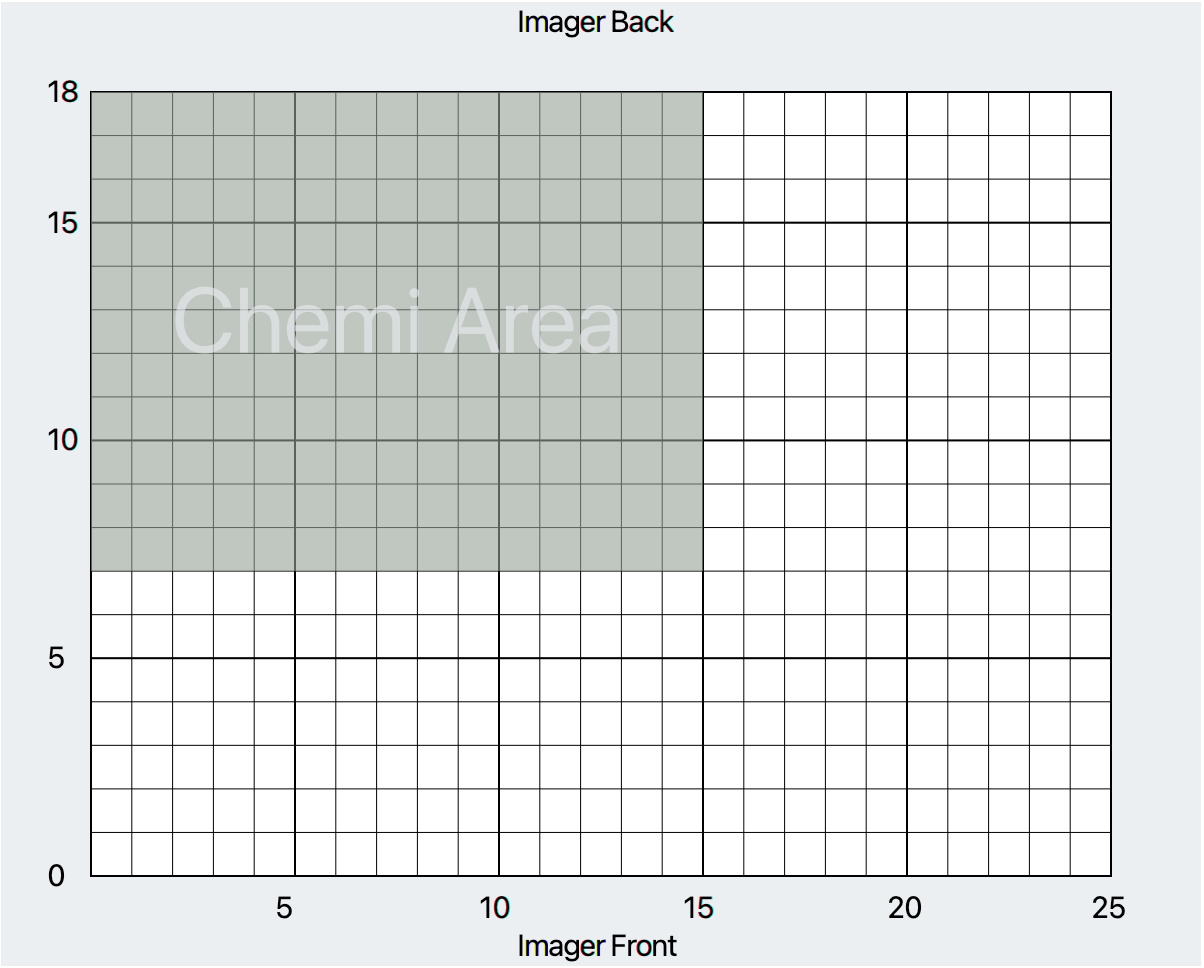
Figure 176. Draw Scan Areas where you want the Odyssey M to acquire an image. If a Scan Area is partially inside the Chemi Area and partially outside the Chemi Area, this message will appear: Draw Scan Area within Chemi region to make chemi detection available. This message is informing you that chemiluminescence detection will not be available for the overlapping Scan Area until it is placed entirely within the Chemi Area.
Adjust the exact size and location of a Scan Area. Select a Scan Area, then adjust the number in the X location, Y location, Width, and Height fields in the Control Panel.
Choose detection options
If you have multiple Scan Areas, click Edit Channels to choose detection options independently for each Scan Area.
Click Scan to begin image acquisition.
Only one non-RGB Epi channel may be selected.
Select up to 4 fluorescent channels.
Detection label reference
The detection labels listed in this table are examples. If you do not see the detection label you want to use, check its spectral characteristics to make sure it is compatible.
| Channel | Labels | Excitation | Emission | Combined Selections Allowed |
|---|---|---|---|---|
| 800 | IRDye® 800CW, DyLight 800 | 785 nm | 816 - 840 nm | 700, 520, 488, RGB Epi |
| 700 | IRDye 680LT, IRDye 680RD, Revert 700 Total Protein Stain, Alexa Fluor 680 | 685 nm | 721 - 740 nm | 800, 520, 488, RGB Epi |
| 520 | Revert 520 Total Protein Stain, VRDye 549, Cy3, Alexa Fluor 546 | 520 nm | 570 - 610 nm | 800, 700, 488, RGB Epi |
| 488 | VRDye 490, FITC, Alexa Fluor 488 | 488 nm | 519 - 543 nm | 800, 700, 520, RGB Epi |
| RGB Epi | Colorimetric Protein MW Markers | NA | NA | 800, 700, 520, 488, Chemi, or 630 Epi, 525 Epi |
| 630 Epi | Pierce Reversible Protein Stain, TMB (blotting) | 631 - 659 nm | Clear Window | RGB Epi |
| 525 Epi | Ponceau S, NBT/BCIP | 500 - 530 nm | Clear Window | RGB Epi |
| Chemi | HRP and AP chemiluminescent substrates | NA | NA | 700, 520, RGB Epi |
Scan
After clicking Scan on the Choose detection options page, the Scan page will open with the image acquisition process already started.
When the scan has completed, the Ready symbol  will appear.
Stop Scan
If you need to stop an image acquisition before the acquisition process completes, click .
This will stop all pending Acquisitions and will remove any partially completed Acquisitions.
Export Acquisition
Ensure the Include all acquisitions option is selected to export every image for every channel from this acquisition process.
Click to export images to a single file. Import the file into Empiria Studio® Software for analysis.
Click to export image file(s). Images exported using this method are not intended for analysis.
Images can be exported as high resolution TIFF files (for journal publications) or as PNG files appropriate for digital presentation (such as a slide show).
When you are exporting a single image, the default export image size shown in the "Export" dialog is the largest dimension (i.e., width or height) of the image set to 10 cm (4 in), and the other dimension is set according to the aspect ratio of the image. If you change the width or height in the dialog, the other dimension will update automatically to maintain the correct aspect ratio.
See View Images in the Image Gallery for more information.
Workflow
- Click to return to the beginning of the workflow to acquire another membrane image.
- Click Rescan to acquire new image(s) with the same settings.
- Click Home to disconnect from the imager and return to the Home page.
Scan a Membrane on the Odyssey XF Imager or Odyssey Fc Imager
Once connected, click Membrane on the Choose Assay page to begin imaging chemiluminescent membranes.
Image settings for this workflow
Resolution: 125 µm
Chemi Acquisition Time Options:
Chemi Manual Entry for Acquisition Time: 5 seconds to 60 minutes
Click the button to enter a custom acquisition time from 5 seconds to 60 minutes.
Resolution: 125 µm
Fluorescence Acquisition Time Options:
Manual Entry for Acquisition Time: 5 seconds to 60 minutes
Choose detection options
The detection labels listed in this table are examples. If you do not see the detection label you want to use, check its spectral characteristics to make sure it is compatible.
| Channel | Labels | Excitation | Emission | Combined Selections Allowed |
|---|---|---|---|---|
| 800 | IRDye® 800CW, DyLight 800 | 785 nm | 816 - 846 nm | 600, 700, Chemi |
| 700 | IRDye 680LT, IRDye 680RD, Revert 700 Total Protein Stain, Alexa Fluor 680 | 685 nm | 716 - 746 nm | 600, 800, Chemi |
| Chemi | HRP and AP chemiluminescent substrate | NA | NA | 600, 700, 800 |
| 600 | Custom | 520 nm | 573 - 637 nm | 700, 800, Chemi |
Scan
After clicking Scan on the Choose detection options page, the Scan page will open with the image acquisition process already started.
When the scan has completed, the Ready symbol will appear.
Stop Scan
If you need to stop an image acquisition before the acquisition process completes, click Stop Acquire.
This will stop all pending Acquisitions and will remove any partially completed Acquisitions.
Export Acquisition
Ensure the Include all acquisitions option is selected to export every image for every channel from this acquisition process.
Click to export images to a single file. Import the file into Empiria Studio® Software for analysis.
Click to export image file(s). Images exported using this method are not intended for analysis.
Images can be exported as high resolution TIFF files (for journal publications) or as PNG files appropriate for digital presentation (such as a slide show).
When you are exporting a single image, the default export image size shown in the "Export" dialog is the largest dimension (i.e., width or height) of the image set to 10 cm (4 in), and the other dimension is set according to the aspect ratio of the image. If you change the width or height in the dialog, the other dimension will update automatically to maintain the correct aspect ratio.
See View Images in the Image Gallery for more information.
Workflow
- Click to return to the beginning of the workflow to acquire another membrane image.
- Click Repeat Acquire to acquire new image(s) with the same settings.
- Click Home to disconnect from the imager and return to the Home page.
Scan a Membrane on the C‑DiGit Blot Scanner
Instructions on this page are for acquiring chemiluminescent Western blot images on a C‑DiGit Blot Scanner using LI‑COR Acquisition Software.
Choose detection options
On the Choose detection options, choose the acquisition time depending on the needs of the target you need to detect.
Scan
Edit Metadata
Click Edit Additional Information to edit metadata associated with the image acquisition.
Export
Choose Analyze to export a Zip File that can be imported into Empiria Studio Software for analysis.
Choose Publish or Present to export an image in a format suitable for a journal article or slide presentation but not for analysis.
Workflow
- Click to return to the beginning of the workflow to start a new scan.
- Click Repeat Acquire to acquire new image(s) with the same settings.
- Click Home to disconnect from the imager and return to the Home page.